Why anchored lighting is the key to integrated-looking convertible furniture
In compact living, perception matters. Anchored lighting — deliberately placed ambient, task, and accent fixtures that visually ‘attach’ a piece of furniture to the room — turns temporary or movable units into elements that read as architecture. Smart control makes those lighting states effortless and repeatable, so a sofa, murphy bed, or fold-down desk transitions between uses while staying visually cohesive.
SEO-friendly overview: core concepts and benefits
- Smart lighting for micro-apartments: reduces clutter, increases functionality, and elevates aesthetics.
- Anchored ambience techniques: valances, toe-kicks, backlights, recessed accents, and scene automation.
- Perception shift: consistent color temperature and control systems turn convertible furniture into 'built-in' features.
Anchored ambience explained: vocabulary every reader should know
- Anchor: Visual attachment created with light — e.g., a halo above a unit or a toe-kick glow beneath it.
- Valance wash: Concealed strip light that creates an even top-edge glow.
- Toe-kick lighting: Low-level light at the base that visually ties furniture to the floor.
- Backlighting: Light placed between a unit and the wall to add depth and separation.
- Tunable white: LEDs that shift color temperature from warm to cool for different scenes.
- Smart scene: A saved lighting state that can be triggered automatically or manually.
Pre-project planning: the essential assessment checklist
- Measure furniture footprint in both stored and deployed positions; account for clearance and sightlines.
- Map power availability: outlets, circuit loads, and whether hardwiring is possible or allowed in rentals.
- Identify mounting surfaces and structural limits (drywall, studs, concrete).
- Define scenes and use-cases: work, sleep, relaxing, entertaining.
- Decide on control preferences: app, voice, wall switch, sensor-based automation.
- Establish a consistent color-temperature family for the apartment (e.g., 2700–3000K for living, 3500–4000K for work zones).
Smart lighting ecosystems and compatibility (2025 primer)
Picking an ecosystem early avoids compatibility problems. Popular ecosystems and protocols to consider:
- Philips Hue (Zigbee + Hue Bridge): Widely supported, rich scenes, tunable white and color options.
- Lutron Caseta: Excellent wall-switch experience, reliable dimming, pairs with many smart hubs.
- Zigbee & Z-Wave: Mesh protocols used by many battery-powered and hub-based devices.
- Matter: Emerging interoperability standard—look for Matter-compatible bulbs, bridges, and switches for future-proofing.
- Apple HomeKit, Google Home, Amazon Alexa: Choose based on voice/control preferences; many hubs bridge ecosystems.
Tip: if you want simple plug-and-play control, start with a well-supported brand (Hue, Lutron, or a Matter-ready option) and layer third-party strips or fixtures that are known to integrate.
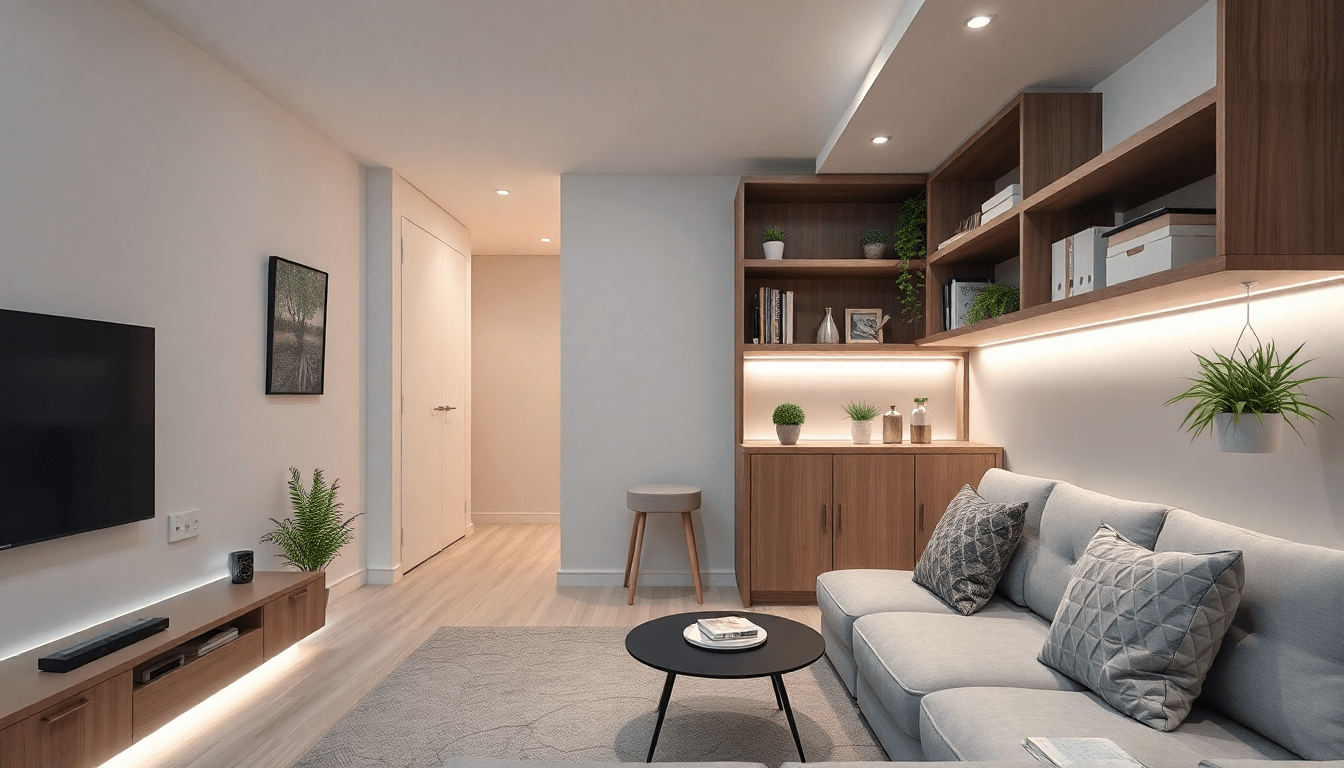
Anchoring techniques by furniture type
Below are practical anchored ambience techniques tailored to common convertible furniture in micro-apartments.
Murphy bed (wall bed)
- Top-edge valance: Install an LED strip in a slim valance or a shelf above the head of the bed to create a crown wash. Tunable white makes the same valance serve daytime and bedtime scenes.
- Backlight depth: A narrow gap with diffused LEDs between bed frame and wall produces a floating, built-in look. Use warm tones for sleeping scenes.
- Integrated bedside accents: Small puck or directional reading lights mounted to a fixed headboard zone for task lighting that doesn’t change when the bed folds.
- Position sensors: Magnetic sensors on the bed hinge trigger a 'sleep' scene which dims ambient lights and switches to night mode for safety.
Sofa bed or futon
- Toe-kick strip: Low-profile LED strip beneath the sofa base visually anchors the piece to the floor, giving it a continuous, built-in look even when folded out.
- Hinged sconce or articulating reading arm: A wall-mounted sconce with a fold-flat arm complements the sofa without blocking movement.
- Accent shelf valance: A thin shelf above the sofa with a concealed strip provides an architectural header.
Fold-down desk / wall desk
- Under-shelf task strip: LED strip under the shelf that serves as both task light and visual anchor when the desk is open.
- Edge grazing: Position light to graze the desk surface and front edge to make the unit appear as a continuous built-in counter.
- USB-C powered fixtures: Use USB-C strips or puck lights for easy integration with chargers—great when outlets are limited.
Modular shelving & storage walls
- Recessed pucks in shelves: Low-profile puck lights embedded in the underside of shelves create cabinetry-style illumination.
- Continuous shelf lighting: Run LED tape along the back of shelves to form a continuous band that ties separate modules together.
Room dividers & movable partitions
- Top rail valance: Integrate an LED channel into the top of a sliding panel to create architectural continuity when closed.
- Floor-mounted toe lights: Small ground lights or linear floor channels visually anchor the divider and delineate zones.
Lighting design details: color, CRI, dimming, and lux targets
- Color temperature: 2700–3000K for relaxing living and sleeping; 3500–4000K for work-focused task areas.
- CRI: Aim for CRI 90+ for areas where color rendering matters (kitchen, desk, artwork).
- Dimming: Use compatible drivers and controls; Lutron and Caseta excel at smooth dimming across many loads.
-
Lux targets:
- Ambient living: 100–300 lux
- Task/desk work: 300–500 lux at the surface
- Reading: 200–500 lux directed at the reading plane
Smart scenes and automation ideas
Scenes are what make anchored lighting feel intentional. Examples to deploy in a micro-apartment:
- Day/Work Scene: Cooler 3500–4000K tune, brighter ambient, desk task lights at 80% (approx. 400 lux on work surface).
- Relax/Entertain Scene: Warm 2700K wash, dim toe-kick to 10–20%, accent spots on artwork or shelving.
- Sleep Scene: 2200–2700K, low-level backlight and toe-kick active as night safety lights; bedside pucks off or set very low.
- Transition automation: Use a hinge or proximity sensor on a murphy bed to trigger sleep scene when the bed is pulled down; use door sensors or a wall tap to trigger desk scene when opened.
- Motion-based night pathway: Low-level toe-kick or baseboard strips triggered by motion sensors to guide occupants across the apartment in the dark.
Powering options: renter-friendly to permanent
- Plug-in smart fixtures: Best for renters—plug into an outlet and conceal cords with paints or raceways.
- Battery-powered LEDs: Useful where wiring isn’t possible; choose rechargeable options and plan for charging cycles.
- Low-voltage systems: 12V/24V LED tape with remote drivers keeps runs thin and heat low; driver can be placed in closets or service spaces.
- Hardwired options: Ideal for recessed fixtures, in-wall switches, and clean permanent installs—hire an electrician and check building codes.
Installation approaches: DIY-safe tips and when to call a pro
- DIY-friendly tasks: attaching LED channels with adhesive, installing plug-in strips, hiding wires with paintable raceways, pairing bulbs with a bridge/hub.
- When to call a pro: running new circuits, hardwiring recessed cans, modifying wall structures, or when permits are required.
- Safety tips: always switch off circuits at the breaker before touching wiring, use fixtures rated for intended use (damp/wet locations), and avoid overloading outlets.
Concealment, finishes, and aesthetics
- Use aluminum LED channels with frosted lenses for a clean, architectural look that also diffuses hotspots.
- Paint cord covers and gap trims to match walls for near-invisible runs in rentals.
- Match fixture finishes (matte black, brass, white) to hardware and room accents to enforce continuity.
- Consider mirrored or glossy back panels behind shelving to amplify light and depth in small spaces.
Materials and product specs to look for
- LED tape: 300–2400 LED/m options; pick 120+ LEDs/m for smooth appearance, CRI 90+, and at least 120–150 lm/W for efficiency.
- Drivers: dimmable, compatible with your chosen dimmer type (leading-edge vs trailing-edge), and sized with 20–30% headroom over load.
- Diffusers and channels: low-profile aluminum channels with frosted polycarbonate lens for even wash.
- Smart controllers: choose ones compatible with Hue/Lutron/Matter if you want broad integration; look for OTA update support.
Budget breakdown: low, mid, and premium strategies
- Low-budget (~$50–$250): Adhesive LED strips, plug-in controllers, smart plugs, battery puck lights; best for renters and quick makeovers.
- Mid-range (~$250–$1,000): High-CRI LED tape in channels, quality drivers, Hue or Lutron integration, motion sensors, and a few recessed accents.
- Premium ($1,000+): Professionally installed recessed lighting, hardwired dimmable circuits, custom valances, Matter-ready controls, and seamless integrated cabinetry lighting.
Sustainability, efficiency, and lifespan
- LEDs drastically reduce energy consumption; choose high efficacy (lm/W) products and dim to extend lifetime.
- Look for replaceable modules and driver accessibility to avoid full-unit disposal when components fail.
- Consider smart schedules and occupancy sensors to keep lights off when not in use.
Maintenance and troubleshooting
- Keep channels dust-free; dust reduces light output and changes color perception.
- Label controllers and keep a small service box with spare drivers, connectors, and adhesive mounts.
- Troubleshooting basics: check connections and power at the source, confirm firmware updates for smart bridges, and test components individually to isolate issues.
Real-world case studies: three micro-apartment scenarios
-
Studio with murphy bed (24m2/260ft2):
- Solution: top-edge valance with tunable white LED tape, backlight gap, and hinge sensor. Scenes: Day/Work, Relax, Sleep.
- Outcome: The bed reads as a headboard wall; scenes automatically adjust when the bed is lowered, creating a seamless sleep experience.
-
One-bedroom with fold-out desk in living room (35m2/375ft2):
- Solution: under-shelf task strip, toe-kick in sofa, recessed pucks in shelving, and a smart switch tied to a wall tap.
- Outcome: Desk feels built-in and transitions between work and lounge with a single tap.
-
Convertible loft with modular storage (45m2/485ft2):
- Solution: continuous shelf backlighting across modular units, accent track lighting, and circadian scenes for loft sleeping area.
- Outcome: Modules read as custom cabinetry while remaining reconfigurable.
Common pitfalls and how to avoid them
- Inconsistent color temperatures: test bulbs and strips together before installing to ensure continuity.
- Overcomplicated controls: users abandon complex setups. Keep primary controls one-tap or voice-accessible.
- Hotspots and glare: use diffusers and position LEDs out of direct sightlines.
- Poor cable management: plan channels and raceways before placing fixtures to avoid visible cords.
Frequently asked questions
-
Q: Can I make lighting look built-in without hardwiring?
A: Yes. Plug-in drivers, adhesive channels, magnetic mounts, and concealed cord covers can deliver an integrated look suitable for rentals.
-
Q: Which color temperature should I standardize on?
A: Pick a family for the main living spaces—2700–3000K for cozy living, and 3500–4000K for dedicated work zones. Use tunable white if you want both in a single fixture.
-
Q: Is it worth using a hub?
A: Hubs offer more reliable mesh networking, advanced scenes, and cross-device integrations. For multiple smart fixtures, a hub is recommended.
Final anchored ambience checklist
- Define primary functional states and scenes.
- Choose a consistent color temperature family and CRI target.
- Select fixtures and control ecosystem (Hue, Lutron, Matter-ready).
- Plan placement, power routing, and concealment before drilling or adhering anything.
- Install motion/position sensors for automatic scene transitions where applicable.
- Test scenes, tweak brightness and color, and document wiring/access points for maintenance.
Conclusion
Anchored lighting is a high-impact, cost-effective strategy to make convertible furniture read as built-in in micro-apartments. By combining architectural LED placement, consistent color science, and smart automation, small spaces feel larger, cleaner, and more intentional. Start with a plan, choose an ecosystem that fits your lifestyle, and prioritize subtle, continuous lighting bands that visually tie furniture to the room.
Visit XENTAR for more lighting, decor & furniture curated for modern homes and creative spaces.


Share:
From Temporary to Timeless: How Smart Ambient Lighting Crafts a Built-In Feel for Convertible Furniture in Small Spaces
Permanent Illusion: Smart Edge Lighting & Sensor Scenes to Make Convertible Furniture Feel Built‑In in Tiny Apartments