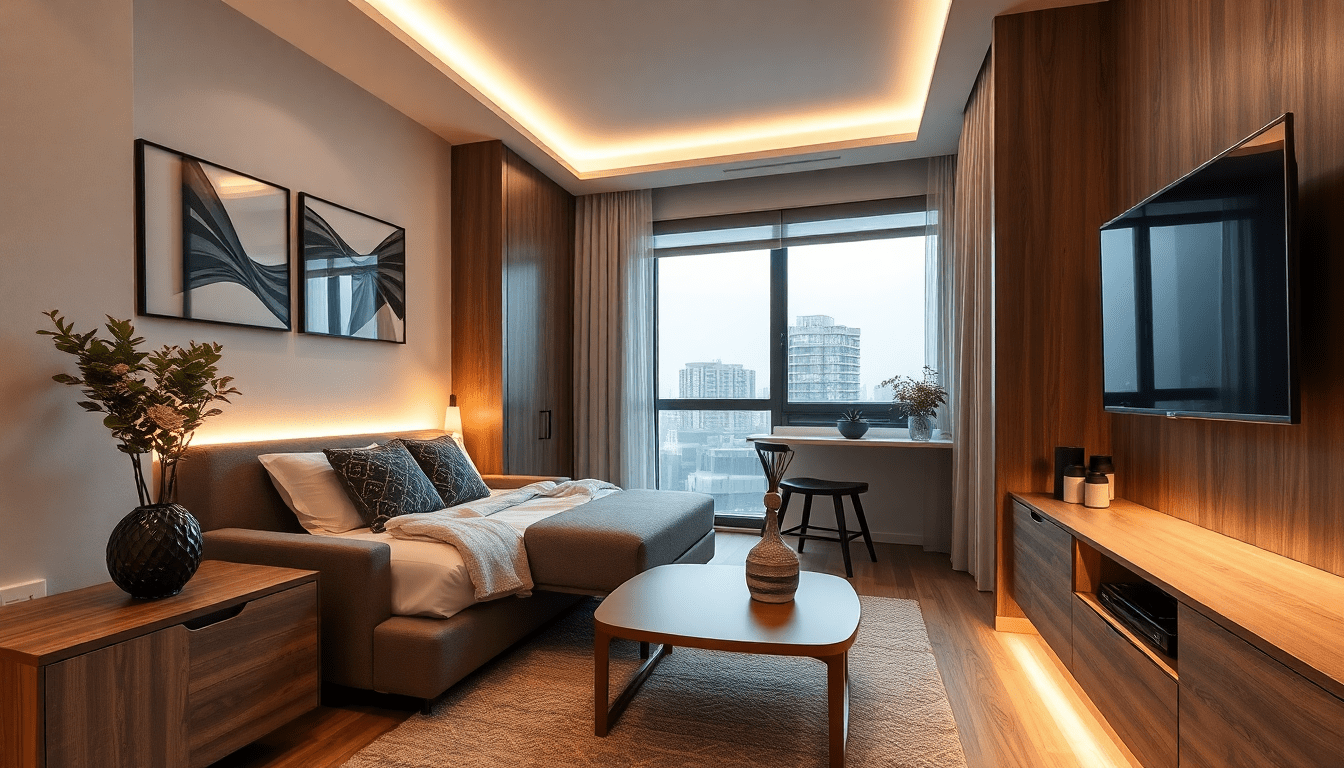
Why smart edge lighting makes convertible furniture feel built-in
In tiny apartments, every visual cue matters. When a foldaway bed, drop-leaf table, or modular sofa appears integrated with the surrounding architecture, a space reads as deliberate and well designed. Smart edge lighting — thin LED strips hidden in profiles, reveals, or edge channels — creates a continuous plane of light that visually anchors furniture to walls and cabinetry. Paired with sensors and automated scenes, these lights make convertible elements behave like true built-ins: they reveal, support, and then disappear on cue.
The psychology of built-in perception in compact homes
Perception of permanence is about continuity, control, and rhythm. Lighting contributes to each:
- Continuity: continuous edge illumination across different pieces makes them read as one element rather than a collection of movable parts.
- Control: sensor-triggered behavior mimics architectural fixtures that respond to context, reinforcing the illusion of permanence.
- Rhythm: consistent color temperature and dimming curves across surfaces create a design language that feels intentional and fixed.
Core components: LEDs, profiles, drivers, and controllers
Choose components carefully to achieve a convincing built-in aesthetic and reliable operation.
- LED types: flexible 2835/5050 strips for tight curves, high-density LED strips for even coverage, or rigid linear modules for crisp lines.
- Profiles and diffusers: low-profile aluminum channels with frosted diffusers hide LED points and produce an architectural glow.
- Drivers: constant-voltage 12V or 24V drivers sized with headroom; dimmable drivers compatible with your chosen control protocol.
- Controllers: Zigbee/Z-Wave/Bluetooth/Wi-Fi or Matter-compatible controllers to manage scenes and integrate sensors.
- Power distribution: plan for trunk lines and local taps rather than daisy-chaining long runs that can cause voltage drop and uneven light.
Sensors and automation: the glue that makes scenes feel alive
Sensors let furniture react without user input. The result is a tactile, near-magical experience where modular pieces seem to anticipate use.
- PIR motion sensors: ideal for room entry/exit scenes and inactivity timeouts.
- Proximity sensors (BLE/UWB): discreetly detect approach and can differentiate occupants for personalized scenes.
- Contact sensors: small reed or hall-effect sensors confirm folded or extended states for precise scene triggers.
- Pressure/weight sensors: confirm a mattress or cushion is in use for instant task lighting activation.
- Ambient light sensors: automatically adjust brightness to maintain consistent perceived output relative to daylight.
Smart home protocols: future-proofing with Matter and Thread
In 2025, interop matters. Favoring Matter-compatible hubs and Thread networks reduces vendor lock-in and ensures sensors, lights, and controllers can communicate reliably.
- Matter: simplifies scenes across devices from different brands.
- Thread: low-latency, mesh networking for responsive controls in apartments with many walls and RF challenges.
- Zigbee/Z-Wave/Bluetooth: still useful for legacy devices but layer them behind a Matter-aware hub when possible.
Design and installation: a step-by-step guide
Plan before you cut. Installation quality is what convinces an eye that a piece is built in.
-
Step 1 — Survey and measure:
- Measure edgings, reveals, and the gap where the LED channel will sit. Account for trim and any door clearance.
- Map power access points and identify driver mounting locations that remain accessible.
-
Step 2 — Prototype:
- Mock up LED placement with tape and temporary strips to test sightlines, color temperature, and diffusion.
- Temporarily mount sensors with double-sided tape to validate detection zones and avoid false triggers from adjacent units.
-
Step 3 — Select hardware:
- Opt for high-density strips where dots would be visible, CRI 90+ for accurate colors, and tunable white if you want flexibility.
- Choose low-profile channels sized to your reveal so the diffuser is nearly flush with the furniture edge.
-
Step 4 — Wiring and power:
- Run 12V/24V trunk lines in hidden cavities. Use properly rated low-voltage cables and quick-disconnects for serviceability.
- Keep driver ventilation in mind; avoid sealing drivers into fully enclosed cavities without thermal relief.
-
Step 5 — Install sensors and program scenes:
- Place motion sensors at entry points, proximity sensors at the piece’s reveal, and contact sensors on moving joints.
- Program scenes for approach, use, hide, and night modes. Test for false positives and tweak thresholds accordingly.
-
Step 6 — Fine-tune light tuning:
- Adjust color temperature and dimming curves to create an architectural glow. Avoid high-contrast accent lighting that reads as decorative.
Sample automation recipes and Home Assistant examples
Here are practical scenes you can implement in 2025-ready hubs. Replace entity names with your devices.
Approach & Reveal (simple logic):
Trigger: proximity_sensor.zone_frontdoor 'entered'
Condition: time between 06:00 and 23:00
Action:
  - set edge_lights to 15% warm white
  - disable deep sleep on smart hub for 30s
  - if bed_contact == 'open', set task_lights to 80%
Work Mode (Home Assistant YAML-style pseudocode):
alias: 'Fold-Desk Work Mode'
trigger:
  - platform: state
    entity_id: sensor.desk_contact
    to: 'open'
condition:
  - condition: sun
    after: '06:00:00'
action:
  - service: light.turn_on
    data:
      entity_id: light.desk_edge_light
      brightness_pct: 90
      kelvin: 4000
  - service: light.turn_on
    data:
      entity_id: light.perimeter_trims
      brightness_pct: 30
Goodnight Hide (failsafe layering):
Trigger: motion_sensor.main_room 'inactive' for 10 minutes
Action:
  - set edge_lights to 5% for 20s
  - after 20s, turn off edge_lights
  - set sofa_contact to 'stowed' scene
Notes:
- Use local automations where possible to maintain functionality if cloud services fail.
- Set sensible timeouts to avoid lights toggling when friends pass through rooms.
- Use ambient light sensors to prevent unnecessary activation during bright daylight.
Case studies and layout ideas for common convertible furniture
Real examples help you visualize implementations in different apartment typologies.
Murphy bed in a studio
- Install concealed LED channels along the cabinet reveals and behind the headboard trim. Use contact sensors to detect bed down state.
- Scene flow: approach dim to 20% warm for reveal; when bed is down, task lights near bedside boost to 80% for reading; hide after inactivity.
Foldaway dining table in an open plan
- Edge lighting around the table skirt and a recessed channel beneath the floating shelf above visually anchors the table to the wall.
- Contact sensor confirms leaf extension and triggers pendant or under-shelf lights while subtly lowering surrounding trims to frame the table.
Convertible sofa/guest bed
- Integrate edge light along the base and behind back cushions with pressure sensors embedded under cushions to detect occupancy.
- Automations can raise ambient warmth for movie mode or shift to cool task lights for daytime seating.
Power, heat, maintenance and safety checklist
- Use drivers with at least 20% headroom over measured load to prevent thermal stress.
- Provide ventilation or thermal pads for drivers inside cabinetry; follow manufacturer max ambient temperature specs.
- Use fire-retardant tape and cable management inside furniture cavities; avoid loose wiring near moving joints.
- Document wiring runs and label connectors for future servicing or if you move out of a rental.
- Use fused circuits or inline fuses on low-voltage runs where long cable runs risk faults.
Styling tips: color temperature, dimming curves and continuity
Subtlety sells the illusion.
- Match color temperature to the apartment's dominant fixtures. For warm interiors, 2700K–3000K reads as architectural; for modern minimalist spaces 3500K–4000K provides crisp clarity.
- Prefer exponential dimming curves over linear to mimic incandescent falloff and produce natural perceived fades.
- Keep accent intensity lower than task lighting. Edge trims should read like halo lighting rather than spotlights.
- Create continuity by using the same channel profile and diffuser across multiple pieces so the light plane reads as a single element.
Cost estimates and budget planning
Costs vary by quality and system complexity. Typical ranges for a small studio installation:
- LED materials (high-quality strips and channels): $60–$250 per linear meter depending on density and CRI.
- Drivers and controllers: $50–$300 depending on dimming features and protocol compatibility.
- Sensors and smart hub: $30–$200 per sensor; $100–$400 for a Matter-capable hub aggregator.
- Professional installation: $200–$900 depending on wiring complexity and cabinetry access.
Tips to reduce costs: prototype with temporary strips, choose local driver mounting to reduce long power runs, and prioritize areas where the built-in illusion will be most visible (entry, bed, main seating).
Common pitfalls and troubleshooting
- Visible LED dots: fix by using higher-density strips or frosted diffusers and proper channel spacing.
- False triggers: relocate or adjust sensitivity on motion and proximity sensors and avoid facing sensors toward windows or shared hallways.
- Color mismatch: calibrate all tunable fixtures in a scene to a single kelvin and set a master scene to preserve balance.
- Voltage drop: mitigate with thicker gauge low-voltage cable and additional feed points for long runs.
- Network lag: prioritize local automations and Thread mesh devices to reduce cloud-dependent latency.
Advanced ideas and creative extensions
- Use UWB or BLE beacons to create personalized approach scenes for different household members.
- Integrate with motorized mechanisms: synchronize lights with actuators on Murphy beds or flip desks for theatrical reveals.
- Use scene macros to coordinate window coverings, HVAC setback, and music when furniture transitions into different modes.
- Layer with acoustic panels and fabric finishes so the furniture reads as built-in both visually and sonically.
Conclusion: turning adaptability into architecture
Smart edge lighting combined with thoughtfully placed sensors and robust scene logic transforms convertible furniture from a necessary compromise into a design asset. In tiny apartments, where every surface counts, lighting can define permanence. The right combination of hardware, careful installation, and subtle automation will convince the eye, simplify daily use, and elevate your apartment from multifunctional to architecturally cohesive.
Visit XENTAR for more lighting, decor & furniture curated for modern homes and creative spaces.


Share:
Smart Lighting for Micro-Apartments: Anchored Ambience Techniques to Make Convertible Furniture Appear Built-In
Architectural Lighting Tricks: Smart Sensor Scenes That Make Convertible Furniture Feel Built‑In in Tiny Homes