Meta-friendly intro
Introduction: Why lighting matters more than you think
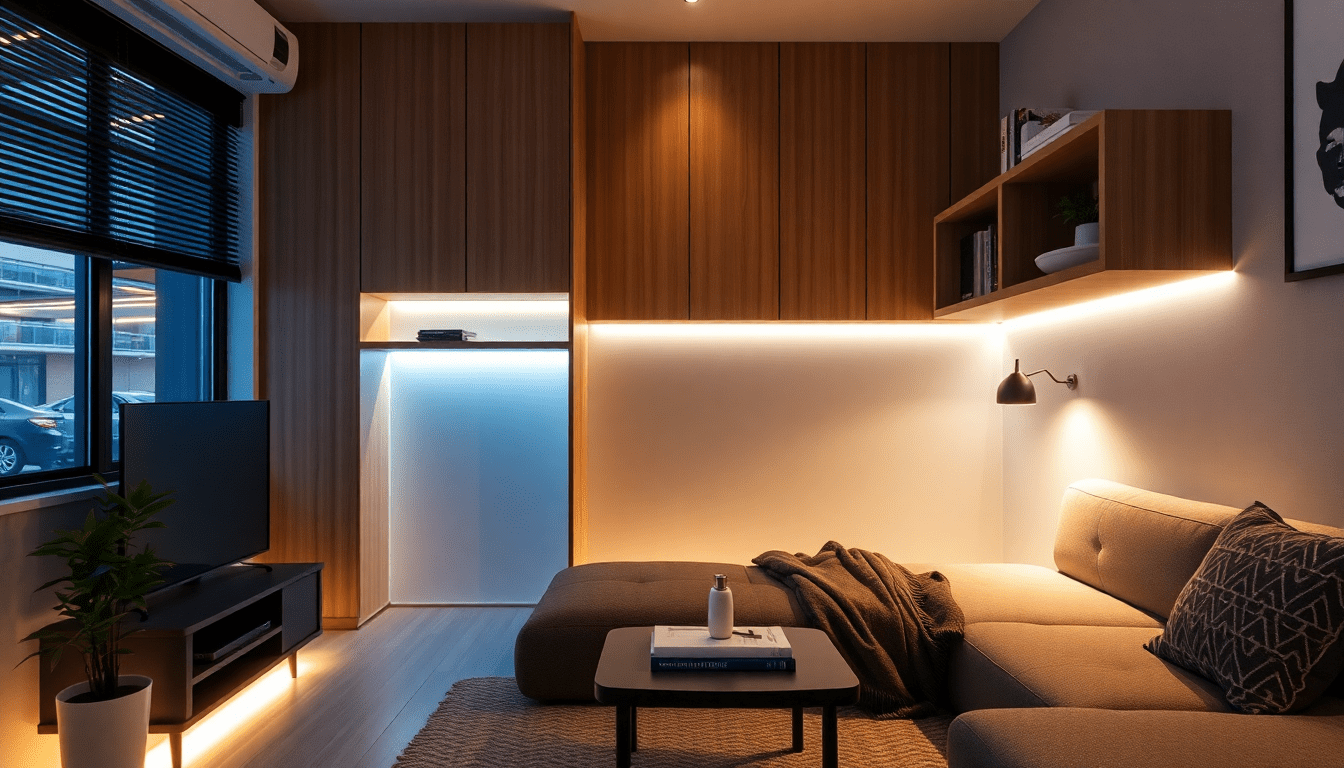
In 2025, compact living continues to shape how we design interiors. Convertible furniture—Murphy beds, sofa beds, fold-down desks, and modular systems—gives small-space dwellers essential flexibility. Yet the challenge remains: how to make moveable pieces look intentional, permanent, and high-end. The answer often isn't a costly renovation; it's lighting.
Ambient lighting is the visual glue that integrates standalone units into a room’s architecture. When paired with smart controls and careful material choices, ambient lighting changes perception: it blurs edges, emphasizes planes, and creates a cohesion that reads as built-in. This guide covers the design principles, technical specs, detailed retrofit instructions, scene recipes, accessibility and sustainability concerns, and real-world examples to help you convert temporary furniture into timeless features.
How ambient lighting creates a built-in aesthetic
Lighting alters spatial perception. Here’s how ambient illumination makes convertibles appear permanent:
- Visual anchoring: Low-level light along bases, recessed channels, or toe-kicks visually ties furniture to the floor and walls so it reads like fixed cabinetry.
- Edge dissolution: Backlighting and concealed strip lights remove harsh silhouettes, creating a soft transition between furniture and architecture.
- Continuity: Continuous lighting runs across modular units unify separate pieces into a single architectural plane.
- Hierarchy of light: Layered lighting establishes purpose and permanence—ambient glow as the backdrop, task light for function, and accents for detail.
- Responsiveness: Automatic scenes, motion triggers and schedules make furniture behave like designed elements of a home rather than temporary fixtures.
Key smart ambient lighting techniques for convertible furniture
Below are practical techniques used by designers and homeowners to create that built-in feel.
- Recessed channels: Aluminum extrusion channels with diffusers mounted into furniture edges hide LEDs and produce a soft, even glow without visible sources.
- Backlighting panels: Placing light behind headboards, shelves, or paneling creates a halo effect that elevates a unit to an architectural element.
- Toe-kick illumination: Low-level lighting under bases simulates a recessed plinth, common in built-in cabinetry.
- Shelf accenting: Puck lights or micro-LED strips on shelves highlight objects and make shelving feel integrated.
- Edge-wash: LED strips along vertical edges wash light onto walls—this creates a floating or embedded appearance.
- Integrated task light: Hidden adjustable task lamps or under-shelf strips activate on open positions (e.g., fold-down desks) for function without visible fixtures when closed.
- Tunable white and color: Tunable white (2700K–6500K) and subtle color tunability allow matching the furniture's mood to time of day and use.
Design fundamentals: Choose the right color temperature, CRI, and lumen levels
Getting technical specs right ensures the lighting feels intentional and consistent.
- Color temperature: For a built-in look, 2700K–3000K provides warm, cozy integration; 3000K–3500K is good for flexible living areas that need neutrality for both relaxing and working. Keep the same temperature across integrated elements to avoid visual dissonance.
- CRI (Color Rendering Index): Aim for CRI 90+ to accurately render fabrics, finishes, and artwork—critical when lighting is part of the design language.
- Lumens and lux: Use layered light: ambient layers at 100–300 lux, task layers 300–500+ lux, and accent lighting targeted to 1000 lux on small objects. Convert lumens to real-world output by considering fixture distribution and room reflectance.
- Dimmability: Dimmable LEDs are essential—dimming preserves atmosphere and prevents the flashy, temporary feel of unmodulated strip light.
Smart controls: Scenes, automation, and seamless interaction
Smart control isn’t a gimmick—it’s how a convertible piece behaves like an integral part of the home. Consider these control strategies:
- Preset scenes: Create customized scenes such as Welcome, Work, Relax, Movie, and Sleep that adjust all integrated lights with one command.
- Occupancy sensing: Passive infrared (PIR) or ultrasonic sensors can illuminate ambient layers when someone approaches a fold-down bed or desk, mimicking the responsiveness of built-in fixtures.
- Schedules and circadian tuning: Use schedules tied to sunrise/sunset or circadian color changes to maintain healthy light rhythms and enhance the perception of permanence.
- Voice and app control: Voice assistants and mobile apps reduce the need for exposed switches, preserving the minimalist built-in look. Keep control UX simple—few scenes, clear names.
- Protocols and future-proofing: Choose devices compatible with open standards like Matter, Zigbee, Thread, or compatible Wi‑Fi platforms to ensure interoperability as smart homes evolve.
Step-by-step retrofit: Convert a sofa bed, Murphy bed, and fold-down desk
These detailed retrofit guides help DIYers and pros take action. Always follow local electrical codes and hire an electrician for hardwiring.
Tools and materials checklist
- Flexible LED tape (tunable white where possible)
- Aluminum LED channels with diffusers
- Dimmable LED driver or smart controller
- Smart lighting controller or bridge (Matter/Zigbee/Thread/Wi‑Fi)
- Wire (low-voltage) and connectors; heat shrink tubing
- Mounting hardware, double-sided tape, screws
- Motion sensors, door/contact sensors (for activation)
- Battery puck lights for no-wiring options
- Basic tools: drill, screwdriver, wire stripper, multimeter, level
Sofa bed retrofit
- Plan placement: Identify the rear edge, underside of the base, and inner side panels where lighting will be visible in both folded and open states.
- Measure and cut LED tape: Use continuous lengths with minimal splices; if splicing is necessary, solder or use manufacturer-approved connectors.
- Mount channels and tape: Attach channels along the base or back frame using screws into structural elements or strong adhesive where appropriate.
- Conceal wiring: Route wiring along frame ribs into a nearby cavity or attach to the underside with clips. For rentals, use adhesive cable channels painted to match the sofa backing.
- Connect to controller: Use a dimmable driver and a smart controller. For plug-in setups, hide the driver behind the sofa and use a wall outlet behind the unit.
- Program scenes: Create tailored scenes: low warm glow for evenings, brighter cool white for daytime, and a motion-triggered pathway light when the bed is extended.
Murphy bed retrofit
- Map movement: Confirm clearances and hinge paths in open and closed positions to avoid wiring pinches.
- Install side-channel lighting: Mount LED channels within vertical side panels to provide consistent backlight when the bed is closed and ambient when open.
- Headboard halo: Backlight the headboard with diffused LEDs for a spa-like built-in headboard effect.
- Safety and wiring: Use flexible cable with strain relief at hinge points and allow service loops to prevent wear.
- Control options: Use a door/contact sensor to trigger desk or night scenes when the bed is lowered.
Fold-down desk retrofit
- Place under-shelf lights: Use slim LED strips under the shelf or the underside of a cabinet for direct task light that disappears when the desk is closed.
- Install activation sensor: Use a magnetic reed switch or contact sensor that turns on task lighting automatically when the desk opens.
- Power choices: For rental-friendly installs, battery-powered strips or rechargeable LED modules work well; for permanence, hardwire into a hidden junction box.
- Integrate smart controls: Link the desk lights to a Work scene with higher kelvin and brightness and a Relax scene that lowers intensity and warms the color.
Wiring tips and safety
- Avoid running low-voltage wiring across hinge lines; use service loops and grommets.
- Use UL-listed drivers and components rated for the installation environment (indoor damp locations, etc.).
- Label wires and circuits for maintenance access; plan driver locations for future replacement.
- When in doubt, consult a licensed electrician—hardwiring into household circuits requires code compliance.
Smart scene recipes: Ready-made settings to try
Use these scene recipes as starting points. Adjust color temperature, brightness, and timing to suit your space.
- Morning Refresh (Wake + Open): 4000K, 60% brightness around the seating/desk area, gradual ramp up over 15 minutes, activate task light at desk to 80%.
- Work Focus: 3500K–4000K, 100% task brightness on desk, ambient at 40% to reduce contrast, background music and closed privacy panels (if applicable).
- Evening Unwind: 2700K, ambient at 30–40%, backlighting soft, toe-kick glow at 10–15%, automated close of desk and dimming over 30 minutes.
- Movie Night: Accent lights off, backlighting set to warm 10%, smart bulb on dimmer for general illumination at 10–15% to reduce glare.
- Overnight Safety: Nightlight scene at 2200K, toe-kick and path lighting at 5–10 lux to navigate without disrupting sleep.
Seasonal and stylistic adjustments to keep spaces feeling fresh
Ambient lighting helps a room adapt to seasonal decor and daylight variations:
- Summer: Use slightly cooler white (3000K–3500K) for perceived brightness while keeping power low to reduce heat and glare.
- Winter: Warmer whites (2700K) enhance coziness and complement layered textiles and warm-toned woods.
- Holiday accents: Temporarily add subtle colored accents (deep ambers or muted teals) for seasonal displays without replacing fixtures.
- Texture pairing: Increase accent lighting on textured wall panels or shelving during colder months to enhance warmth and visual depth.
Accessibility and safety considerations
Smart ambient lighting can improve safety and accessibility in small spaces:
- Motion-activated path lighting: Provides safe navigation at night without bright overheads.
- Voice-activated scenes: Reduces the need to access switches or controls that might be blocked by furniture.
- High-contrast lighting for vision impairment: Use higher CRI and focused task light for reading and close work.
- Emergency considerations: Keep a low-level maintained-lit exit path for quick egress and a battery backup for critical lighting components.
Sustainability and energy efficiency
Well-designed ambient lighting can be both beautiful and eco-conscious:
- LED efficiency: LED technology delivers high lumens per watt, reducing energy usage compared to halogen or incandescent sources.
- Smart schedules: Automation reduces wasted light by turning off layers when not needed and dimming when appropriate.
- Driver selection: Choose efficient, high-power-factor drivers and look for Energy Star-rated components where available.
- Repairability: Design installations so drivers and controllers are accessible—sustainable systems are easier to service and upgrade.
Budget planning: Cost ranges and ROI
Costs vary widely depending on complexity and permanence:
- Entry-level (rental-friendly): $40–$200 — battery lights, plug-in LED tape, basic smart bulbs.
- Mid-range: $200–$1,200 — aluminum channels, quality LED tape, smart controllers, professional-grade puck lights.
- High-end: $1,200+ — hardwired low-voltage distributed systems, in-wall drivers, Matter-compatible controllers, integrated sensors.
ROI considerations:
- Perceived value: Lighting upgrades often yield outsized visual impact, making a space feel more finished and increasing property appeal.
- Energy savings: LEDs and smart schedules lower electricity use.
- Resale and rental: Built-in-feeling solutions can increase marketability for rentals and resale by making small spaces feel premium.
Common pitfalls and how to avoid them
- Hotspots and strip dots: Use diffusers and wider-profile channels; position LEDs with appropriate spacing and avoid direct sightlines to bare LEDs.
- Color mismatch: Buy LEDs from the same production batch and verify CCT with a multimeter or manufacturer data to avoid mismatched temperatures.
- Overlighting: Excessively bright ambient light destroys intimacy—dim and layer instead of raising intensity.
- Cluttered controls: Keep scenes intuitive; too many options reduce adoption and spoil the seamless effect.
- Poor serviceability: Concealed drivers are neat, but plan access panels for maintenance and future upgrades.
Case studies: Small-space transformations
Real-world examples illustrate the power of lighting.
- Studio apartment, 350 sq ft: A sofa bed received under-base LED tape and a wall-mounted backlight behind a modular shelving unit. Result: the living area reads as a single continuous lounge with a floating sofa and integrated shelving—no oversized fixtures needed.
- Guest room / home office combo: A fold-down desk with automatic under-shelf lighting and a Murphy bed with headboard halo provided both privacy and functionality. The room transforms from workspace to guest suite with a single scene.
- Co-living pod: Modular pods in a co-living space used continuous LED runs across multiple pods to create visual continuity and an architect-designed feel without permanent construction.
Maintenance checklist and troubleshooting
- Monthly: Inspect adhesive and mounts, clean diffusers, verify smart controller connectivity.
- Annually: Test drivers, replace aging LEDs if color shifts are visible, update firmware on smart controllers.
-
Common issues:
- Flicker: check driver compatibility and dimmer type.
- Color shift over time: replace entire run or re-batch LEDs for consistency.
- Connectivity drops: update firmware, use mesh extenders, or migrate to Matter-compatible hardware.
FAQs: Quick answers to common questions
- Can I install ambient lighting in a rental? Yes—use battery-powered modules, plug-in drivers, surface-mounted channels attached with removable adhesive, and avoid hardwiring.
- Will LEDs damage fabrics? Properly diffused LED light at appropriate temperatures will not cause significant fading; avoid high-intensity directional spotlights on delicate textiles.
- How do I pick the right controller? Choose based on protocol compatibility (Matter, Zigbee, Wi‑Fi), required channels (single-channel for tunable white, multiple for RGBW), and integration with your smart home ecosystem.
- Are smart lights secure? Use devices with regular firmware updates, change default passwords, and prefer local-control or Matter-supported devices where possible.
Putting it together: A design checklist before you start
- Define the furniture’s roles (sleep, work, lounge) and list required light layers.
- Choose color temperature and CRI standards; document them.
- Map wiring and driver locations with maintenance access in mind.
- Select controllers and sensors that align with your smart home platform and future-proofing goals.
- Plan scenes and name them simply for everyday use.
- Test mockups with temporary strips to validate visual effect before committing to channels or hardwiring.
Conclusion: Lighting as the finishing touch that makes convertible furniture feel permanent
Smart ambient lighting is more than decoration—it’s a strategic design tool that changes how spaces are perceived and used. By focusing on layered light, careful specification (CCT, CRI, lumen levels), concealed fixtures, and intuitive automation, you can make convertible furniture read as built-in, increasing both utility and aesthetic value in small spaces. Whether you’re retrofitting a rental sofa bed with battery-powered tape or designing a hardwired Murphy bed with Matter-compatible automation, light is the secret ingredient that turns temporary solutions into timeless design.
Visit XENTAR for more lighting, decor & furniture curated for modern homes and creative spaces.


Share:
Scene-Based Light Anchors: Sensor-Lit Ambient Strategies to Make Foldout Furniture Function Like Custom-Built Units in Small Homes
Smart Lighting for Micro-Apartments: Anchored Ambience Techniques to Make Convertible Furniture Appear Built-In