Meta-friendly intro
Smart sensor scenes transform convertible furniture into seamless built‑in elements with layered lighting, concealed fixtures, and automated scene choreography.
Introduction: why lighting is the secret to built‑in perception
In tiny homes, square footage is a premium and every piece of furniture must earn its place. Convertible furniture offers flexibility, but its seams, hardware, and changeable profiles can make a space feel modular rather than integrated. Architectural lighting solves that problem. Thoughtfully placed LEDs, sensor‑driven scenes, and concealed fixtures visually fuse movable pieces with surrounding architecture, turning a fold‑down bed or drop‑leaf table into what reads like custom millwork.
How sensor scenes alter perception
Lighting influences how we interpret edges, depth, and material. When light is choreographed around furniture states instead of room zones, the eye reads continuity. Sensors that detect contact, motion, pressure, or ambient light allow scenes to respond to human intention, so illumination follows action. That responsiveness hides mechanism, reinforces silhouette, and creates emotional cues that make temporary furniture feel permanent.
Core lighting principles for the built‑in illusion
- Continuity: Create unbroken lines of light along faces and reveals so modular pieces visually extend into walls.
- Hierarchy: Layer ambient, task, accent, and navigational lighting to control focus and hide functional seams.
- Timing: Use fades and delays that mimic human motion to mask mechanical transitions.
- Color consistency: Keep correlated color temperature (CCT) and CRI consistent across fixtures that define a furniture element.
- Concealment: Hide strips, drivers, and sensors in shadow gaps, toe kicks, and behind trims.
Sensor types and where they work best
Choose sensors based on the event you need to capture. Low‑profile and multi-function sensors keep sightlines clean.
- Contact sensors: Best for cabinet doors, Murphy beds, and drop leaves. They trigger instantly when a panel moves.
- Motion sensors: Ideal for presence detection in living areas and corridors; choose low‑angle sensors to avoid false triggers.
- Pressure and load sensors: Reliable for seating and benches where occupancy matters without visible hardware.
- Proximity and IR sensors: Useful for hands‑free triggers near handles and work surfaces.
- Ambient light sensors: Adjust scene brightness and CCT in response to daylight to maintain perceived continuity.
Smart lighting protocols and controllers
System choice affects reliability, latency, and expandability.
- Zigbee and Z‑Wave: Local mesh systems with low latency and strong reliability for sensor scenes.
- Thread: Emerging standard with low power, IPv6 compatibility, and great local control for advanced systems.
- Wi‑Fi: Useful for cloud‑based services and higher throughput, but can be less resilient for real‑time local scenes unless supported by a local hub.
- Bluetooth Mesh: Handy for simple point‑to‑point and small networks, with low energy consumption.
- Central controller: Use a local hub or dedicated scene controller that can run automations locally to prevent cloud lag during transitions.
Designing scenes by furniture state
Rather than room names, design your scenes around furniture states: stowed, transition, deployed, and night. This mental model keeps lighting predictable and purpose-driven.
- Stowed scene: Low ambient wash, concealed toe‑kick lighting, and subtle accents to visually join furniture to walls.
- Transition scene: Short, choreographed fades and pathway lights that guide motion and mask hinges.
- Deployed scene: Higher intensity task lighting focused on the activity zone, with stronger accents along the furniture's face.
- Night scene: Minimal, warm navigational lighting for safety and comfort.
Detailed scene recipes and timing
Below are repeatable scene recipes with suggested timings and lux targets. Adjust for material finishes and personal preferences.
- Stowed / Closed
- Goal: Hide seams, create continuity, low energy.
- Targets: ambient 80–150 lux, accent bands 50–120 lux, CCT 2700–3000K.
- Timing: instantaneous state; maintain until sensor change.
- Transition
- Goal: Guide movement, hide mechanics, prevent glare.
- Targets: toe kicks and pathway lights at 10–50 lux, localized incremental increase toward deployed targets.
- Timing: crossfade over 300–900 ms for quick motions, up to 1.5 s for dramatic reveals.
- Deployed / Active
- Goal: Provide functional light for tasks and strengthen facade presence.
- Targets: task areas 300–500 lux, accent and uplights 150–250 lux, CCT 3000–3500K for tasks, 2700–3000K for relaxed use.
- Timing: fade up within 200–500 ms if urgency needed, or 600–1,000 ms for comfortable transitions.
- Night / Navigation
- Goal: Safety and low distraction.
- Targets: 10–40 lux, very warm 2200–2700K.
- Timing: instant on with 0–200 ms for safety triggers like motion near stairs.
Layout strategies: where to place fixtures to sell the built‑in effect
The placement of luminaires is more important than their output. Use the architecture to conceal and reveal.
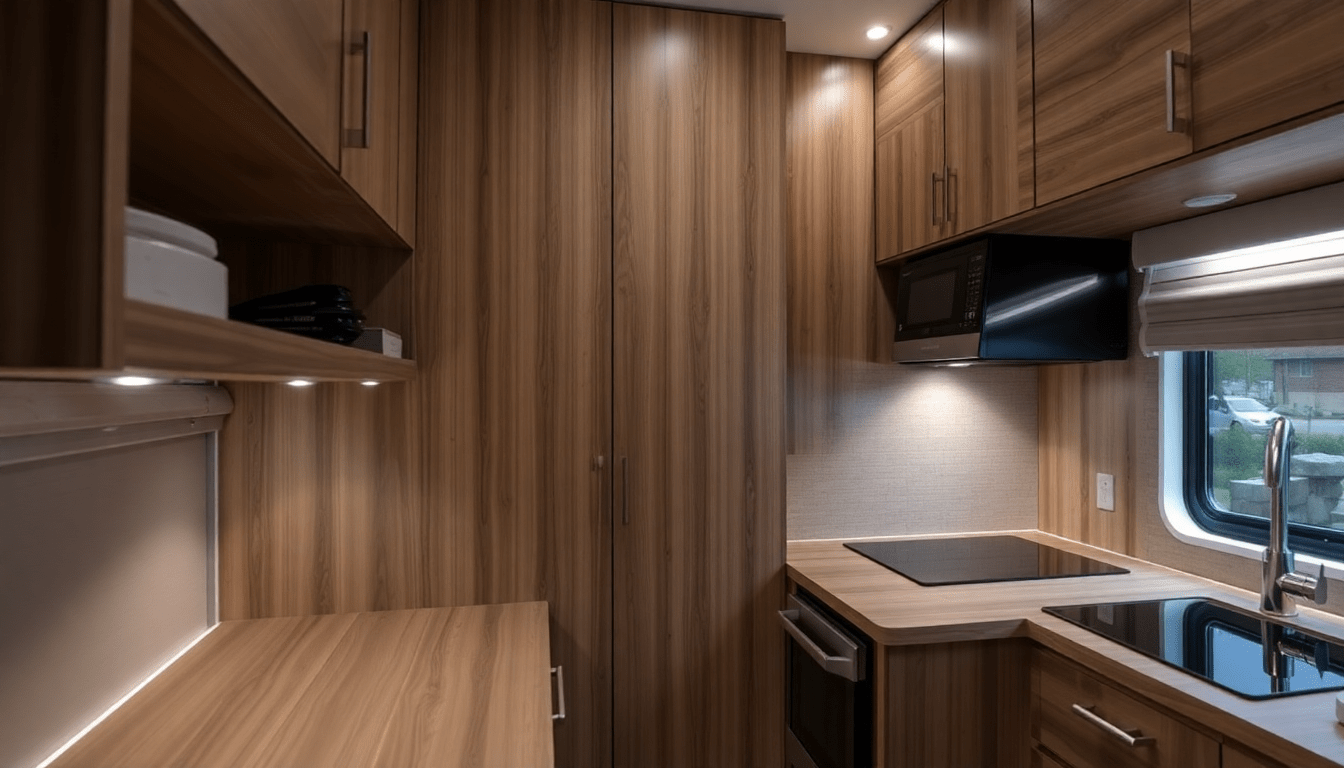
- Shadow gaps and reveals: Recess linear LEDs into shadow gaps over cabinet faces to create an uninterrupted line when furniture is folded.
- Toe‑kick lighting: Continuous toe‑kick strips visually anchor furniture to the floor and mask base seams.
- Backlit panels: Diffused backlighting behind a fixed fascia creates a permanent glow that ties mobile units to the wall plane.
- Vertical washes: Low-angle uplights on either side of a fold‑down bed draw the eye to the facade and make it read as built‑in millwork.
- Integrated reading lights: Recessed or micro‑arm lamps activated by occupancy give a bespoke, finished appearance similar to custom cabinetry.
Material and finish decisions that work with light
Material choices determine reflection, diffusion, and how seams read under light.
- Matte vs gloss: Semi‑matte surfaces minimize specular hotspots from linear LEDs and look more like cabinetry under soft wash light.
- Light tones and translucency: Frosted back panels and light wood veneers spread light and hide gaps better than dark, highly textured surfaces.
- Edge profiles: Smooth routed edges with shadow gaps read cleaner than framed faces; use a reveal to host linear strips.
- Trim and paint: Match visible trims to surrounding moldings to make fixtures feel like original architecture.
Case study 1: 24ft tiny home with Murphy bed and convertible dining
Project brief: 24ft tiny home with a Murphy bed, foldaway dining table, and a sofa that converts into a guest bed. Goal: Make the sleeping and dining elements feel like built‑in cabinetry while keeping a flexible living area.
- System: Thread mesh for robust local scene execution, central controller with fallback schedule.
- Sensors: Magnetic contact on the Murphy bed, contact on table leaf, pressure mat under sofa, ambient sensor near window.
- Fixture plan: Recessed linear at top and back of Murphy unit, toe‑kick LED below bench seating, pendant on a dedicated circuit for the dining leaf.
- Scenes: Stowed = continuous warm band along the Murphy header and toe‑kick; Transition = 800 ms fade up of cove and pathway lights; Deployed = task spotlights and adjustable reading lights engage, pendant ramps to 60% brightness for dining.
- Outcome: Users reported the bed felt like a fixed wall unit; guests did not perceive seams during evening use because the transition scene masked hardware.
Case study 2: Micro‑apartment with sliding partition and modular storage
Project brief: 350 sq ft micro‑apartment with a sliding partition that reveals a bedroom nook and modular shelving used as seating and storage.
- System: Zigbee mesh with a local hub; scenes executed locally to reduce latency.
- Sensors: Proximity sensor on the partition track, contact sensors on shelving doors, motion sensor in the main living area.
- Fixture plan: LED wash behind shelving, concealed linear in partition headrail, downlights on a scene dimmed for stowed state.
- Scenes: Stowed = soft wall wash and low toe kicks, Transition = headrail linear fades in sync with partition motion, Deployed = focused wall wash and bedside reading lights on.
- Outcome: Partition appears structural due to consistent headrail lighting and synchronous fades that align with the partition travel time.
Installation checklist and best practices
Plan thoroughly before committing to trim and finishes.
- Map actions to events: List every user action (pull, sit, open) and assign a sensor and scene to each.
- Mock up in full scale: Tape out reveals and temporary LED strips to test sightlines and lux levels at night and day.
- Centralize drivers: Group LED drivers and power supplies in accessible service panels hidden behind cabinets.
- Conceal wiring: Route low voltage runs inside panels and use flexible conduit for moving joints.
- Use consistent CCT and CRI: Keep color and quality of light consistent among fixtures defining an element.
- Label everything: Document sensor locations, controller IDs, and scene rules for future maintenance.
Wiring, power, and safety considerations
While LED low‑voltage wiring is safer and easier for DIY, mains work and permanent junctions require licensed electricians. Follow local codes.
- Low-voltage strategy: Use 12V or 24V LED tape with central drivers sized for run length; keep voltage drop to a minimum by locating drivers near longest runs.
- Mains switching: Install relay modules or smart switches behind panels, but consult an electrician for in‑wall mains modifications.
- Isolation for moving parts: Keep power and data connections flexible, with service loops and strain relief to prevent fatigue.
- Heat management: Provide ventilation for drivers and avoid enclosing high‑wattage components in sealed compartments.
Programming tips: writing convincing scene choreography
Good programming makes furniture motion believable and elegant.
- Trigger hierarchy: Contact sensors should take precedence over ambient motion to avoid contradictory scenes during transitions.
- Delays and deadbands: Add short delays (200–400 ms) to avoid flicker from rapid open/close actions; use deadbands in ambient sensors to prevent constant toggling in changing daylight.
- Scene chaining: Create a transition scene as an accessible step between stowed and deployed to blend changes rather than snap them.
- Edge cases: Program fallback states for sensor failure or network outage to maintain safety lighting.
- User controls: Implement physical scene buttons or a single rotary controller alongside app control for guests and tech‑averse users.
Accessibility and inclusion
Design scenes to be usable by people with mobility limits or sensory sensitivity.
- Provide manual overrides at accessible heights and voice control where appropriate.
- Avoid rapid or high‑contrast strobing during transitions; prioritize smooth fades.
- Use tactile cues on hardware and ensure navigation lighting aligns with primary circulation paths.
Seasonal and daylight strategies
Daylight changes throughout the year; sensors help maintain perceived continuity without manual intervention.
- Ambient light compensation: Use ambient sensors to lower interior brightness on bright days, keeping contrast between furniture and background consistent.
- Seasonal presets: Ramp CCT slightly cooler in summer and warmer in winter to match daylight shifts and maintain comfort.
- Adaptive scenes: Schedule automatic adjustments for sunrise/sunset to preempt daylight transitions and reduce sudden changes.
Maintenance and long‑term care
Plan for servicing, firmware updates, and component replacement without disturbing finishes.
- Accessible driver locations: Keep drivers and controllers reachable behind removable panels or service doors.
- Firmware: Keep hub and sensor firmware up to date for security and reliability.
- Spare parts: Stock spare LED strips, diffusers, and common sensors to reduce downtime.
- Documentation: Maintain a digital folder with wiring diagrams, scene logic, and supplier details.
Troubleshooting common problems
Issues often arise from sensor placement, network congestion, or mismatched dimming curves.
- False triggers: Reduce motion sensor sensitivity, adjust detection angles, or add masking to avoid pets and HVAC drafts.
- Flicker or incompatible dimming: Use drivers and LED fixtures that support the same dimming protocol and have low-end dimming capability.
- Network latency: Move critical automations to local execution on the hub rather than cloud rules.
- Uneven illumination: Add diffusers, adjust beam angles, or increase linear LED spacing to remove hotspots.
Costing examples and budget strategies
Costs vary by finish, control complexity, and sensor count. Here are typical ranges and ways to save.
- Entry budget: Basic LED tape, simple motion sensors, and a consumer smart hub. Suitable for smaller installs where perfect concealment is not required.
- Mid range: Recessed linear strips, contact and pressure sensors, a professional controller with local automation. Best balance for convincing built‑in looks.
- High end: Custom extrusions, micro‑lensed diffusers, high CRI tunable white systems, commercial controllers with professional commissioning.
- Save by: Starting with strategic focal elements rather than lighting everything, using multi‑function sensors, and grouping drivers to reduce component count.
Shopping list template
- Linear LED strips, high CRI, compatible with chosen driver and dimming protocol.
- Recessed profiles and diffusers sized for shadow gaps and toe kicks.
- Contact sensors and magnetic reed switches for panels and leaves.
- Pressure mats or load sensors for seating.
- Low‑profile motion and proximity sensors for circulation and near‑field triggers.
- Central hub or scene controller with local automation capabilities.
- LED drivers sized with 20–30% headroom for reliability and longevity.
- Flexible conduit and service panels for wiring access.
How to test and tune for the final reveal
Commissioning is where the design becomes believable.
- Night testing: Evaluate scenes after dark to see how fixtures define edges and hide seams.
- Day testing: Use ambient sensor thresholds to confirm scenes don’t fight daylight.
- Human testing: Observe real people performing typical actions to ensure triggers and timing feel intuitive.
- Iterate: Tweak lux levels, CCT, and fade timings based on feedback and photographic documentation.
SEO and content marketing tips for designers and makers
Creating content about these projects can attract homeowners and builders searching for tiny home lighting solutions.
- Use long tail keywords: phrases like architectural lighting tiny home, sensor scenes convertible furniture, and Murphy bed lighting ideas.
- Include visuals: Before/after photos, diagrams, and short video clips of transitions perform well in search and social.
- Share case studies and data: Lux targets, sensor types, and scene timing make posts valuable and linkable.
- Target how‑to queries: Users search for installation steps, sensor recommendations, and wiring basics—those pages rank well.
Inspiration gallery ideas for social sharing
- Short clips showing stowed to deployed transitions with synchronized lighting.
- Closeups of concealed shadow gaps and toe‑kick bands that sell the built‑in illusion.
- Side‑by‑side comparisons of the same furniture under different scenes and color temperatures.
Future trends to watch
- Smarter local AI at the hub that learns occupant patterns to anticipate scenes.
- Advances in micro‑LEDs and OLED panels enabling even thinner concealed lighting elements.
- Greater adoption of Thread and other low‑latency, local standards for dependable scene execution.
Summary checklist: implementable next steps
- Audit furniture actions and choose appropriate sensors for each action.
- Design continuous light lines in shadow gaps and toe kicks to visually anchor convertible pieces.
- Pick a reliable local controller and plan for firmware updates and maintenance.
- Mock up scenes in full scale and tune lux, beam angles, and fade timings during commissioning.
- Document and label all hardware for future troubleshooting.
Closing thoughts
Architectural lighting and smart sensor scenes are powerful tools that transform the way convertible furniture is perceived in tiny homes. By designing light to follow intention and embedding fixtures into the architecture, you can create a cohesive, calming environment that feels custom and intentional. Whether you are a designer, builder, or DIY enthusiast, the principles in this guide will help you plan, implement, and tune systems that make flexible furniture read as built‑in.
Visit XENTAR for more lighting, decor & furniture curated for modern homes and creative spaces.


Share:
Permanent Illusion: Smart Edge Lighting & Sensor Scenes to Make Convertible Furniture Feel Built‑In in Tiny Apartments
Designing Light Anchors: Smart Scenes & Sensor Placement to Make Foldaway Furniture Feel Built‑In