Designing Light Anchors: Smart Scenes & Sensor Placement to Make Foldaway Furniture Feel Built‑In
Meta-friendly intro
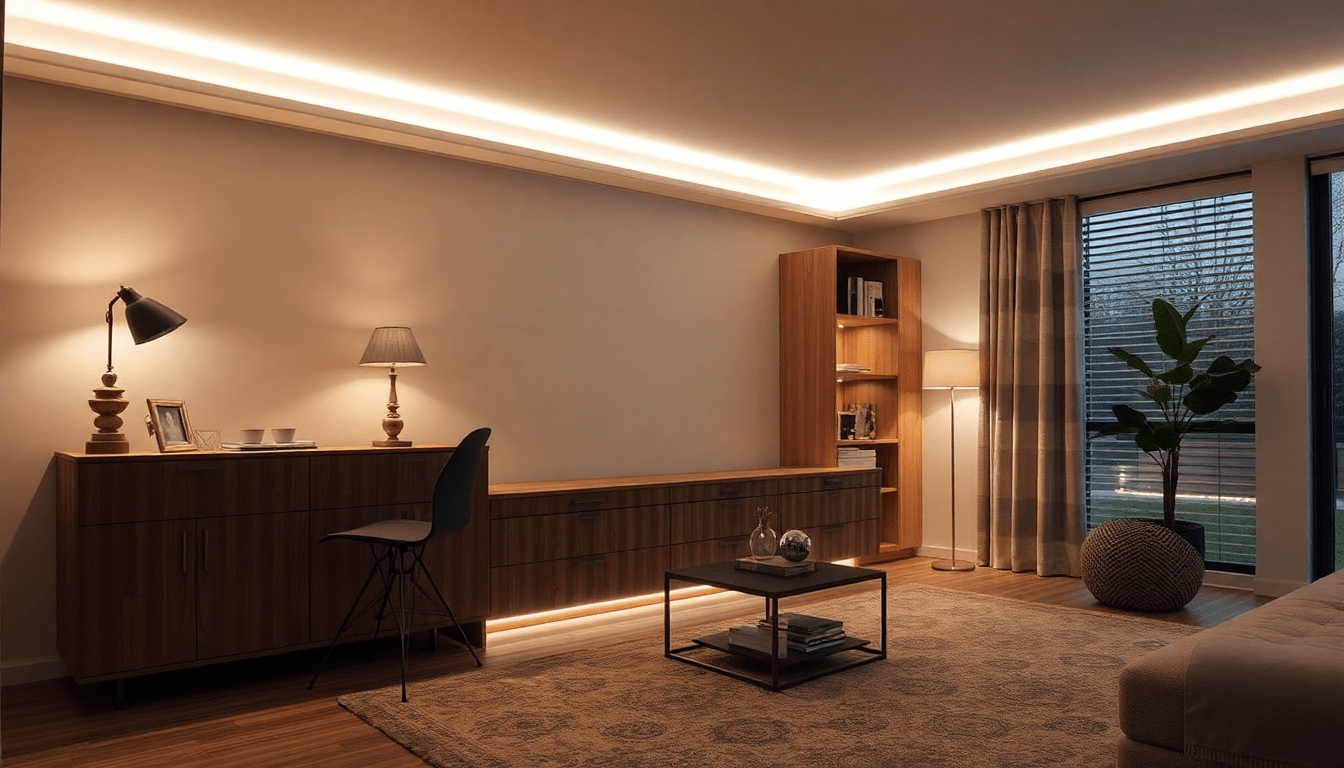
Why lighting is the missing piece for foldaway furniture
Foldaway furniture is a practical hero in small spaces, but its temporariness can make a room feel transitional or unfinished. Lighting changes perception: when you anchor a foldaway piece with integrated illumination and synchronized smart scenes, the eye reads it as deliberate architecture rather than an afterthought. Thoughtful sensor placement completes the illusion by ensuring lights respond to activity and furniture state without creating annoyance.
What we mean by 'light anchors'
- Light anchors are consistent, deliberate sources that define the edges, cavities and functional planes of a foldaway element (top rails, recessed cavities, toe kicks, backlighting).
- They pair with ambient and task layers to make the piece read as part of the room's architecture.
- Anchors should be visible in both states—folded and deployed—without being obtrusive.
Design principles that make foldaway furniture feel built‑in
- Continuity: Use lighting treatments that visually connect the furniture to adjacent architecture (continuous toe-kick, vertical mullion lighting, or recessed reveals).
- Concealment: Fixtures should hide when possible and reveal light rather than hardware.
- Consistency of finish and color: Match channel finishes, diffuser textures and CCT across the room so the foldaway piece reads as part of a coherent palette.
- Intelligent responsiveness: Sensors + scenes sync the lighting to furniture state and occupant activity—crucial for perceived integration.
- Human-centered specification: Set lux targets and CCT for the activity and the time of day to support comfort and circadian-friendly transitions.
Which fixtures anchor best (and where to use them)
Choose fixtures that disappear when the furniture is folded yet provide strong visual definition when lit.
- LED tape (8–14mm, 12–24V DC): Best for recessed top rails, behind reveals and toe-kicks. Use opal diffusers to remove dots and create a continuous glow.
- Slim linear profiles (aluminum extrusions with opal covers): Create vertical frames or perimeter lines that look architectural and consistent.
- Micro recessed downlights (20–35mm): Accent faces or create pools of light on a desk or reading area while remaining subtle when the piece is closed.
- Low-profile puck lights: Thin, surface-mounted puck lights are excellent inside cavities for task illumination and can be positioned to avoid being seen when folded.
- Backlit panels or edge-lit acrylic: Provide even plane and depth when a foldaway panel is closed; very effective for headboards or cabinet fronts.
Light quality & technical specs to prioritize
- Color temperature (CCT): 2700–3000K for sleeping and lounging zones; 3000–3500K for focused tasks. Maintain +/-200K consistency across anchors and room lighting.
- CRI (Color Rendering Index): Aim for CRI 90+ for textiles, wood finishes and accurate skin tones.
- Lux targets: Ambient: 100–300 lux, Task (desk/reading): 300–500 lux, Night/path: 5–50 lux.
- Dimming performance: Smooth dimming down to 1–5% to enable cinematic and night modes without color shift.
- LED density & beam angle: For tape use 120+ LEDs/m for even diffusion behind opal; linear extrusions should be sized for an even wash (10–20mm width for discrete lines).
Sensor types: how each contributes to the illusion
Different sensors serve different roles—combined they provide robust intelligence while reducing false activations.
- Occupancy/motion sensors (PIR, microwave, dual-tech): Detect presence to turn on ambient and task layers. PIR is energy-efficient and common; microwave is better for detecting small movements; dual-tech reduces false positives.
- Ambient light (photocell): Prevents anchors from turning on when daylight is sufficient and helps maintain consistent scene brightness.
- Contact/position sensors: Magnet or reed switches, hall-effect sensors, or small accelerometers detect if a piece is folded or deployed and trigger furniture-specific scenes.
- Proximity and capacitive sensors: Useful for touch-free manual triggers on furniture edges—excellent for guest-friendly controls.
Strategic sensor placement: guidelines and examples
- Ceiling-mounted PIR: Mount 2.4–3m high for broad room coverage; aim across the activity plane, not down corridors or large glass which cause reflections.
- Wall-mounted PIR: Place 1.8–2.2m high angled to capture activity zones—good for detecting someone approaching a foldaway desk or pulling down a Murphy bed.
- Contact sensors for moving panels: Install on the frame and a fixed jamb so the sensor closes when the unit is folded. Use small low-profile sensors that sit in routed channels to remain concealed.
- Ambient light sensors: Locate near the furniture but out of direct sun. If the anchor is recessed, place the sensor inside the cavity to read the local light level accurately.
- Multiple sensors and logic: Use sensor fusion (e.g., occupancy + contact) to prevent scenes from triggering when someone walks past a closed piece or when the furniture is in transition.
Smart scenes that synchronize furniture state and time of day
Develop a small, memorable set of scenes that respond to the furniture state (folded/deployed) and context (arrival, work, night).
- Reveal (Arrival): Contact closed (folded) + room occupied & evening: warm 2700K toe-kick and edge lighting at 30–50% to draw attention to the piece as an intentional focal plane.
- Work/Focus: Contact open (desk down) + occupancy detected: Task lights at 400 lux on work surface, 3000–3500K for visual acuity; ambient layers at 30% to reduce eye strain.
- Relax (Evening): Time-based or manual trigger: main lights dim to 20–30%, warm 2700K wall-wash highlights, and anchor lighting soft at 10–20% to keep the piece readable but unobtrusive.
- Night Path: Motion at night + bed deployed: low-level floor/ toe-kick lighting at 5–10 lux and bedside reading on at 20–30% with a slow fade on/off to be non-disruptive.
- Deploy Sequence: Contact sensor senses panel movement: temporarily raise ambient and task lights, mute hallway sensors, and set a gentle 0.5–1s delay so motion from the deployer doesn't immediately turn off other zones.
Control ecosystems & compatibility (what to choose)
Choose an ecosystem based on how much integration, reliability and expandability you want.
- High reliability, pro installs: Lutron Caseta, Lutron RA2, or wired DMX/DALI for commercial-grade smooth control and consistent dimming performance.
- Consumer smart ecosystems: Philips Hue, Sengled, or Nanoleaf for easy setup and app-driven scenes. Works well for accent anchors and color tuning but may rely on bridges for reliability.
- Open smart home stacks: Home Assistant, Hubitat, or SmartThings for flexible automations, sensor fusion and compatibility across Zigbee/Z-Wave/Wi‑Fi devices. Great for complex scene logic (fusing contact + occupancy + ambient).
- Matter & future-proofing: Favor Matter-capable bridges/hubs and device endpoints where possible to improve cross-platform compatibility over time.
Wiring topologies: new build vs retrofit vs hybrid
Plan wiring to minimize visual clutter while meeting electrical codes and usability expectations.
- New build (best): Run low-voltage (12–24V DC) LED power from a hidden driver inside adjacent cabinets. Hardwire occupancy and line-voltage switches to a central control panel. Use conduit for future changes.
- Retrofit (least invasive): Use battery-powered wireless sensors, plug-in LED drivers, and wireless controllers (Zigbee, BLE, Wi‑Fi) to avoid drywall work. Conceal LED tape in routed reveals or mounting channels.
- Hybrid: Hardwire power for fixtures but use wireless sensors and controllers for detection and scene triggers—best compromise for reliability and minimal carpentry.
Step-by-step retrofit installation plan (practical)
- Survey & measure: Note fold paths, reveal depths, door swings and adjacent sightlines. Photograph and draw basic elevations.
- Decide anchor locations: Pick 2–4 anchor points per piece (top rail, inner cavity, back panel, toe-kick).
- Select fixtures & drivers: Pick LED tape density, diffusers and a driver sized at 20–30% above load for long life.
- Plan sensor locations: Sketch sensor FOV and ensure no direct line to windows; choose battery or wired sensors depending on access.
- Mount channels & lights: Route tape into channels, affix linear profiles and secure drivers in adjacent cabinetry or utility spaces.
- Install sensors: Place contact sensors on frame/jamb and occupancy sensors angled to the activity plane.
- Program scenes & test: Build scenes in your hub/app, then test during different times of day and with the furniture in both states. Tune timeouts and sensitivity.
- Finish: Add opal diffusers, paint recesses matte, seal channels to minimize dust build-up, and create labeled overrides for guests.
Detailed scene examples with values you can copy
- Reveal (Evening arrival): Anchor edge: 2700K @ 60-80 lm/m (tape) at 40% dim level; toe-kick: 2700K at 10–15 lm/m for pathway; fade-in 700–900ms.
- Work (Desk deployed): Task: 3500K, 500 lux on desktop, no glare; Ambient: 3000K at 25% to provide visual context; Motion sensor timeout 10–15 minutes.
- Night (Bed deployed): Bed reading: 2700K at 150–250 lux at bedside; Night path: 2200–2700K at 5–15 lux; motion triggers 3–5 minute timeout.
Case study: Studio Murphy bed — full specification
Scenario: 35m² studio apartment with a Murphy bed on the living-wall.
- Anchor strategy: Vertical slim linear lights on each side of the bed face (opposite a continuous toe-kick) and concealed top rail LED tape behind a 15mm reveal.
- Fixtures: 120 LEDs/m 3000K CRI 95 LED tape in an opal extrusion; micro recessed spotlights above a pull-down desk for task work.
- Sensors & logic: Magnetic reed contact at the headboard, ceiling PIR for general occupancy, and an ambient photocell in the reveal. Logic: if contact open & PIR active -> Work scene; if contact closed & time > sunset -> Relax/Reveal scene.
- Outcome: When folded, the bed reads as accent wall due to vertical framing and soft toe-kick glow. When deployed, task lights and bedside reading activate automatically and hallway sensors are suppressed to prevent accidental shutoffs.
Case study: Foldaway desk in a living room — quick build guide
- Anchor points: Recessed top-rail LED tape, under-shelf puck task lights, and a faint backlight behind the closed panel to create depth.
- Sensor layout: Wall-mounted PIR aiming at the desk area (1.8m height), contact sensor on the desk top, ambient sensor tucked into the reveal.
- Scenes: Desk Deploy -> Task light on to 400 lux, Ambient dim to 25%; Desk Stowed -> Backlight on 15% to keep visual continuity.
Cost considerations & rough budgeting
Costs vary with complexity and brand choices. These ballpark ranges (USD) are for planning purposes:
- LED tape & profiles: $30–$150 per meter depending on density and diffusers.
- Drivers & dimmers: $40–$250 depending on channel count and protocol (basic 12V driver to driver with DMX/DALI control).
- Sensors: $15–$80 for battery wireless PIR; $60–$200 for wired or dual-tech sensors; $10–$40 for contact sensors.
- Control hub: $60–$300 for consumer hubs; $250–$1000+ for pro controllers and panels.
- Installation labor: $200–$1200+ depending on retrofit complexity and electrician time.
Maintenance, durability & accessibility
- Driver ventilation: Keep LED drivers in ventilated spaces to extend life—overheating shortens lifespan.
- Dust and cleaning: Use sealed profiles and easy-removable diffusers to clean tape and channels without disassembly.
- Battery replacement strategy: Opt for wired sensors where possible in high-use zones; use long-life lithium batteries and set devices to low-reporting frequency for battery savings.
- Accessibility: Provide clearly labeled physical overrides and voice/remote controls for guests and less‑tech‑savvy users.
Common problems and how to fix them
- Issue: Lights trigger when someone passes in a hallway. Fixes: Re-angle motion sensors, use dual-tech sensors, narrow the FOV with lens accessories, or add contact logic so anchors only activate if furniture state also indicates presence.
- Issue: Tape light shows hotspots or uneven glow. Fixes: Increase LED density, use opal diffusers, add secondary linear profiles, or choose higher-quality strips with closer LED spacing.
- Issue: Color shift when dimming. Fixes: Use high-quality drivers and LEDs rated for smooth dimming (check TRIAC/ELV compatibility), or move to low-voltage constant-voltage drivers with compatible dimmers.
- Issue: Sensors drain batteries quickly. Fixes: Increase reporting intervals, use occupancy (on/off) rather than continuous motion reporting, or replace with wired sensors.
Accessibility & universal design considerations
- Ensure manual overrides are within reach and clearly marked; consider rocker switches with tactile markers for low-light operation.
- Provide voice control and simplified app scenes labeled with plain language (e.g., 'Work Desk', 'Guest Bed', 'Night Path').
- Set up slow fades for scene transitions to avoid disorientation for older adults or people with sensory sensitivities.
Sustainability & energy efficiency
- LEDs already reduce energy use substantially; enhance savings with occupancy scheduling and ambient light harvesting (photocells).
- Choose drivers with high power factor and low standby consumption, and aim for recyclable extrusions and low-VOC finishes for environmental safety.
- When retrofitting, salvage existing wiring and channels where safe to reduce waste and cost.
SEO & content checklist for your project page
When publishing your project or product page, include the following to maximize organic visibility:
- Primary keywords: foldaway furniture lighting, built-in lighting for Murphy bed, smart lighting for small spaces, sensor placement foldaway furniture.
- Secondary keywords: LED tape recessed lighting, contact sensors for cabinets, occupancy sensor placement, smart scenes for multifunctional rooms.
- Include clear H2/H3 structure, short meta description (under 160 characters), alt text for images focusing on anchor locations and sensor views, and step-by-step schematics or diagrams.
- Provide specific numbers (CCT, lux, mounting heights) and a downloadable checklist so the page doubles as a practical resource.
Downloadable checklist (copyable)
- Survey space: yes/no
- Choose anchor points (top rail, toe-kick, backlight): chosen? yes/no
- Fixture type selected (tape/linear/puck/recessed): chosen? yes/no
- Sensors planned (occupancy/contact/ambient): list
- Driver & dimmer selected: spec
- Control hub: selected? yes/no
- Install method (hardwired/retrofit/hybrid): selected?
- Scene names & triggers documented: yes/no
Further reading & resources
- Lighting design basics: recommended guides from lighting associations and manufacturer spec sheets.
- Smart home automation: community forums & open-source projects for example automations and YAML templates.
- Product selection: look for CRI 90+, proper warranty and good dimming reviews.
Final thoughts
Making foldaway furniture feel built‑in is both a design and technical challenge. The visual success comes from consistent anchors and concealed fixtures; the behavioral success comes from sensors and scenes that respond predictably to furniture state and human activity. When you combine architectural thinking with smart control logic, even the most compact, multifunctional rooms can achieve the calm, intentional feel of custom-built interiors.
Visit XENTAR for more lighting, decor & furniture curated for modern homes and creative spaces.


Share:
Architectural Lighting Tricks: Smart Sensor Scenes That Make Convertible Furniture Feel Built‑In in Tiny Homes
Smart Ambient Lighting Anchors: Psychology-Backed Scene Recipes & Sensor Placement to Make Convertible Furniture Feel Built-In in Small Homes