Meta
Introduction: Why Grounding Glow Matters in Small Spaces
In tiny apartments every design decision must pull double duty: look intentional while maximizing function. Modular furniture offers flexibility, but without thoughtful detailing it can feel temporary. Concealed smart lighting—the grounded glow that traces edges, hides gaps, and layers light—bridges the gap between movable pieces and built-in architecture. This article is a deep dive into technique, tools, design principles, and smart-home strategy so you can make modular furniture read as permanent, curated, and comfortable.
What Does 'Built-In' Mean Visually and Psychologically?
- Visual continuity: Built-ins align with walls, floors, and ceiling lines. Concealed lighting extends those lines with uninterrupted planes of light.
- Perceived permanence: Soft, integrated illumination signals that a piece belongs to the room rather than being an afterthought.
- Boundary definition: Light creates perceived depth, pushing furniture visually into walls and defining zones without physical bulk.
- Emotional comfort: Layered, tunable light supports mood and daily rhythms—key in compact homes with limited natural light.
How Concealed Smart Lighting Achieves the Effect
Concealed lighting is less about brightness and more about placement and diffusion. The techniques below are used by interior designers and lighting pros to make modular pieces read as built-in:
- Backlighting to remove the negative space between furniture and walls
- Uplighting to visually crown tall modular units and merge them with ceilings
- Toe-kick lighting to float cabinets and reduce perceived weight
- Integrated shelf lighting to make storage appear deeper and more thoughtful
- Edge-lighting with acrylic to produce a continuous plane along modular surfaces
Core Benefits for Tiny Apartments
- Space feels larger—subtle uplighting and backlighting soften hard edges and increase perceived volume.
- Furniture feels bespoke—lighting disguises seams and underscores design intent.
- Improved functionality—task lighting integrated where you need it reduces clutter.
- Better energy use—LEDs are efficient and dimmable; scenes save energy by matching light to activity.
- Stronger resale appeal—well-lit modular systems look higher-end and thoughtfully installed, which helps small-space buyers and renters.
Design Principles: Read This Before You Buy LEDs
Start with intent. Use these principles to keep your concealed lighting from looking like a retrofit band-aid.
- Continuity over spots: Favor continuous channels and diffusers over exposed segments of LEDs.
- Consistent color temperature: Keep a single white balance for all concealed fixtures in a room unless you have a deliberate layered strategy.
- Appropriate brightness: Use lower lumen outputs for ambient coves; reserve higher outputs for task zones.
- Dimmer-first mindset: Always design with dimming capability to control intensity and ambiance.
- Hidden power strategy: Plan where drivers and transformers will live—ideally inside furniture cavities or discreet cabinets.
Selecting the Right Products: What to Look For in 2025
The market has matured—look for these features to ensure a future-proof and polished installation.
- Addressability and tuning: RGBW or tunable white for color scenes and circadian-friendly schedules.
- Matter and Thread support: Interoperability across ecosystems avoids fragmentation and future-proofs smart control.
- High CRI (90+): Better color rendering for decor and skin tones.
- Low-profile aluminum channels: For heat dissipation and clean visual finish.
- Frosted diffusers: To create uniform planes and hide individual diodes.
- IP rating where needed: IP44 or higher near sinks or bathrooms.
Comprehensive Placement Guide: Where to Hide Light
Use these placements to anchor modular pieces and achieve the built-in illusion.
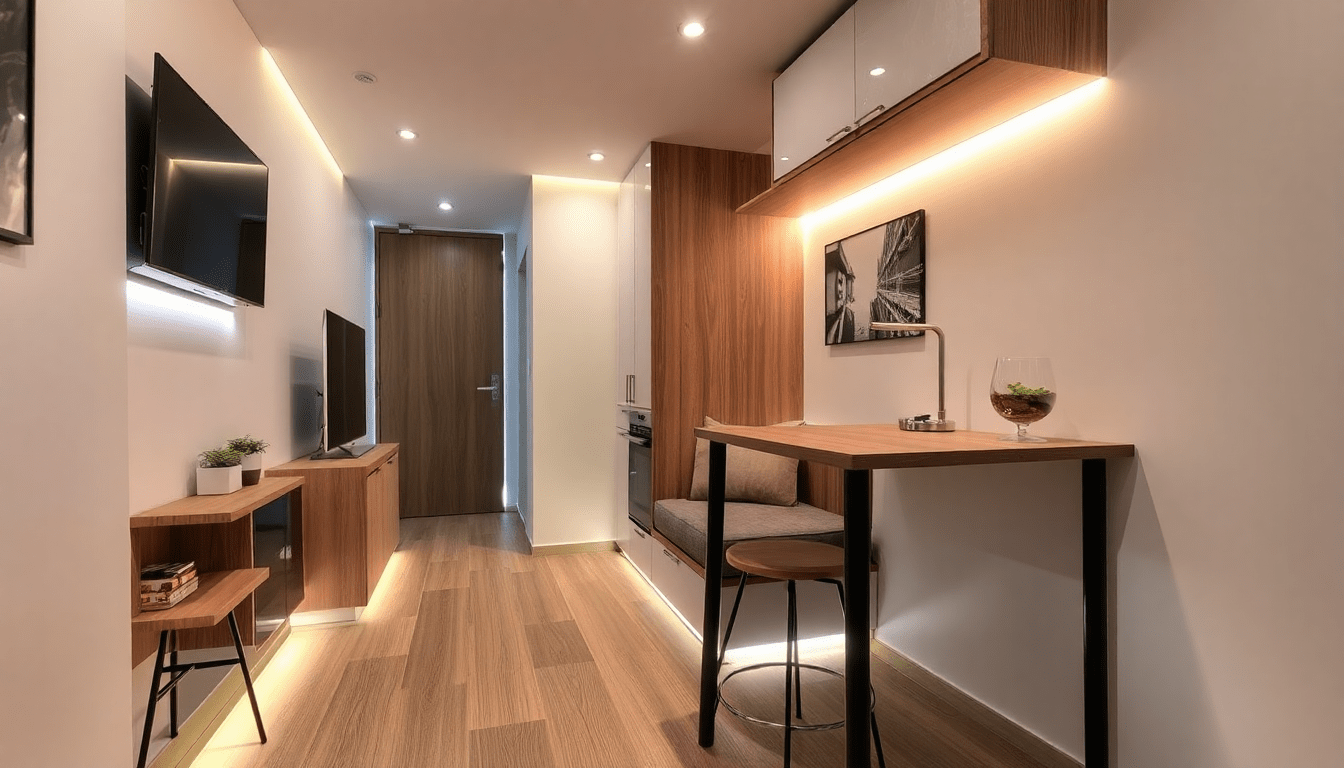
- Back-rail recess: LED strips recessed along the back edge of bookcases or media units softly push them into the wall.
- Top crown cove: Uplighting at the top of wardrobes and tall units merges them with ceilings.
- Under-shelf and shelf-edge lighting: Illuminates contents and makes shelving feel integrated.
- Toe-kick plinths: Recessed lighting along cabinet bases floats furnishings and conceals gap shadows.
- Edge-lit panels: Laminated or acrylic edges that glow create a continuous visual plane along modular surfaces.
- Inside drawers and cabinets: Micro-LEDs or reed-switch-activated lights increase perceived build quality.
Technical How-To: Step-by-Step Installation Workflow
- Audit and plan: Map furniture positions, identify power access, and sketch desired light placements. Note depth, thickness, and any movable joints.
- Choose voltage and strip type: 24V is preferable for longer runs with less voltage drop; 12V works for shorter runs and smaller units.
- Buy channels, diffusers, and mounting hardware: Aluminum channels are available in surface and recessed profiles. Diffusers come frosted or opal to suit your desired glow.
- Pick controllers and power supplies: Use certified drivers sized at 20% extra capacity to prevent overheating and early failure.
- Route wiring: Conceal cables through hollow panels, modular legs, or cable grooves. Use flexible conduit or wire raceways for protection.
- Test-run before final assembly: Power strips on the bench and verify color temperature, brightness, and connectivity to controllers.
- Install channels and diffusers: Secure channels, press in LED strips, snap-on diffusers, and hide edges with trim pieces.
- Mount power supplies and controllers: Place drivers in ventilated cavities away from heat-sensitive items.
- Commission scenes and automations: Configure schedules, bedtime dimming, and work scenes in your hub or app.
- Finish and seal: Use minimal caulking where needed and ensure access panels for maintenance.
Detailed Wiring Tips and Safety Notes
- Label all cable runs and use color-coded heat-shrink or tape for future proofing.
- Maintain ventilation around power supplies and avoid enclosing them in airtight boxes.
- Use UL-listed or CE-certified components to meet local code and reduce fire risk.
- Install inline fuses or overload protection when running multiple strips on a single supply.
- When in doubt, consult a licensed electrician for hardwired connections or when adding in-wall power.
Lumen, Lux, and Color Temperature Guidelines
Lighting metrics are crucial for design intent. Here are practical targets for tiny apartments:
- Ambient cove/backlight: 150–300 lumens per linear meter for a soft wash.
- Task under-shelf lighting: 300–600 lumens focused at task plane for desks and countertops.
- Toe-kick lighting: 50–150 lumens per meter for gentle navigation light.
-
Color temperature choices:
- 2700–3000K: Warm and cozy for living and bedroom zones.
- 3000–3500K: Neutral warm for balanced living and kitchens without daylight.
- 3500–4000K: Cooler task-oriented tones for workspaces, but avoid mixing with warm cove unless intentional.
- CRI: Aim for CRI 90+ where color fidelity matters (art, textiles, skin tones).
Smart Integration Strategies for a Seamless Experience
To make modular lighting feel built-in, the control experience must be unified. Consider these approaches:
- Matter-first devices: Choose strips and controllers that support Matter for cross-platform reliability through 2025 and beyond.
- Thread for low-latency mesh: Thread border routers enhance reliability for many small devices in compact apartments.
- Grouped zones: Group modular pieces into single-room scenes to control an entire wall as a single built-in unit.
- Local automations: Use local processing in hubs like Home Assistant, HomeKit, or other privacy-first platforms to ensure functionality even when internet is down.
- Voice and tactile control: Add a discreet wall-mounted scene switch or smart button that feels like a built-in control surface.
Advanced Design Tactics: Layering and Movement
To elevate the illusion, use motion and dynamic lighting subtly:
- Adaptive circadian lighting: Slowly shift warm to neutral white through the day to mimic natural light.
- Presence-triggered task lights: Motion-sensor under-shelf lights that only activate when the desk is occupied.
- Soft transitions: Fade scenes over several seconds to avoid jarring changes that reveal retrofit tactics.
- Accent animations: Minimal addressable strip effects for occasional drama—avoid constant motion which reads cheap.
Cost Breakdown and ROI Considerations
Investment depends on scale and integration level. Typical budget bands:
- Basic DIY single-piece kit: $60–$200 (strip, driver, channel, diffuser)
- Multi-piece, integrated DIY: $200–$800 (multiple strips, better controllers, higher-CRI strips)
- Professional integrated build: $800–$3,500+ (hardwired power, in-wall control, bespoke cabinetry integration)
Return on investment is often intangible: increased rental or resale appeal, improved habitability, and fewer additional fixtures needed. LEDs' energy efficiency also reduces operating costs.
Maintenance, Troubleshooting, and Upgrading
-
Common issues:
- Flicker: usually undersized or failing drivers—replace or upsize driver
- Color mismatch: swapping strips without matching CCT/CRI—standardize on product families
- Connectivity dropouts: upgrade mesh or move to wired control if practical
-
Maintenance tips:
- Keep diffusers clean to maintain light quality
- Inspect drivers annually and ensure ventilation
- Label connectors for easy replacement
- Upgrading: Design channels to be removable so you can swap upgraded strips or controllers without rebuilding furniture.
Case Studies: Real-World Tiny Apartment Transformations
Below are short scenarios that illustrate how concealed lighting made a tangible difference.
- Micro-Studio, 28 m2: A modular media wall with back-rail LED strips and a top crown cove increased perceived ceiling height and reduced TV glare. Tenants reported a calmer vibe and greater satisfaction with the living area.
- Convertible Sleep/Work Loft, 32 m2: Under-shelf task lighting activated only when the desk was pulled out, preserving restful warm tones at night. The apartment felt both functional and restful without additional fixtures.
- Rental Renovation, 45 m2: Developers added plinth lighting to kitchen base cabinets and backlit wardrobe panels. The apartment rented faster, and the light details were highlighted in listing photos, increasing perceived value.
Styling Tips: Make the Glow Part of Your Aesthetic
- Minimal Scandi: Warm 2700–3000K cove lighting and slim black channels to maintain clean profiles.
- Modern Industrial: Edge-lit smoked acrylic panels with cooler 3000–3500K uplighting for contrast against raw finishes.
- Japandi: Soft toe-kick lighting and backlit slatted wood panels in a uniformly warm palette.
- Color accents: Use occasional RGBW highlights inside shelving to make curated objects pop—keep the main ambient white to maintain the built-in illusion.
Common Mistakes and How to Avoid Them
- Too bright: Excessive lumens break the cozy, built-in feel. Use dimming and lower lumen density for ambient effects.
- Exposed hardware: Visible drivers, messy wiring, or mismatched diffusers scream retrofit—conceal everything.
- Mismatched whites: Mixing 2700K with 4000K creates a visually fragmented space—standardize white balance by room.
- Overuse of color: Constant color effects cheapen the design—reserve color for accents or occasional scenes.
Checklist: Pre-Installation Final Review
- Do you have a clear plan showing strip lengths, driver locations, and channel placement?
- Are power supplies rated 20% above load and placed in ventilated spaces?
- Will diffusers cover LED dots at typical viewing angles in the apartment?
- Is the control ecosystem unified, or will you end up with multiple apps?
- Have you planned access for maintenance and future upgrades?
Final Thoughts: The Lasting Impact of a Grounding Glow
Concealed smart lighting is an understated but powerful strategy to make modular furniture feel built-in in tiny apartments. It unifies disparate pieces, enhances functionality, and supports mood and circadian health. The secret is careful planning: choose the right hardware, design continuous lines of light, conceal wiring, and implement smart controls that act like built-in intelligence rather than aftermarket clutter.
With intentional placement, consistent color temperature, and considered smart integration, you can transform a flexible, movable setup into a space that reads as deliberate, permanent, and elevated—exactly what modern small-space living needs.
Visit XENTAR for more lighting, decor & furniture curated for modern homes and creative spaces.


Share:
Framing the Fold: Shadow & Edge-Lighting Techniques to Make Modular Furniture Read as Architecture in Tiny Apartments
Edgeless Integration: Sensor‑Tuned Ambient Lighting to Visually Fuse Modular Furniture with Architecture in Small Apartments