Why biophilic smart lighting transforms small spaces
Small homes and studio apartments often struggle with two visual problems: limited depth and a sense of temporariness when using modular furniture. Biophilic smart lighting—lighting that mimics natural patterns, color temperatures, and motion—addresses both. By combining ocean-wave projectors (subtle motion), warm LED layers (anchoring warmth), and sensor-driven scenes (seamless automation), you can create the illusion of architectural integration and a calmer, healthier atmosphere.
Meta-friendly introduction (SEO benefit)
How this guide is structured
- What each element does and why it matters.
- Design goals and visual strategies for small spaces.
- Product selection and placement recommendations.
- Sensor scene ideas and precise settings to try.
- Installation tips for renters and tight budgets.
- Case-based layout examples and troubleshooting.
The science behind biophilic lighting and perceived space
Biophilic design taps into human evolutionary preferences for natural light, movement, and color. Two perceptual effects are useful here:
- Motion creates depth: Subtle movement (like water ripples) gives the eye a distant focal plane, increasing perceived depth in a small room.
- Warm anchors feel structural: Warm, continuous light along bases and edges tricks the brain into reading furniture as part of the building mass rather than stand-alone items.
Smart sensors amplify both effects by making lighting feel instinctive: it responds like built-in architecture rather than an add-on.
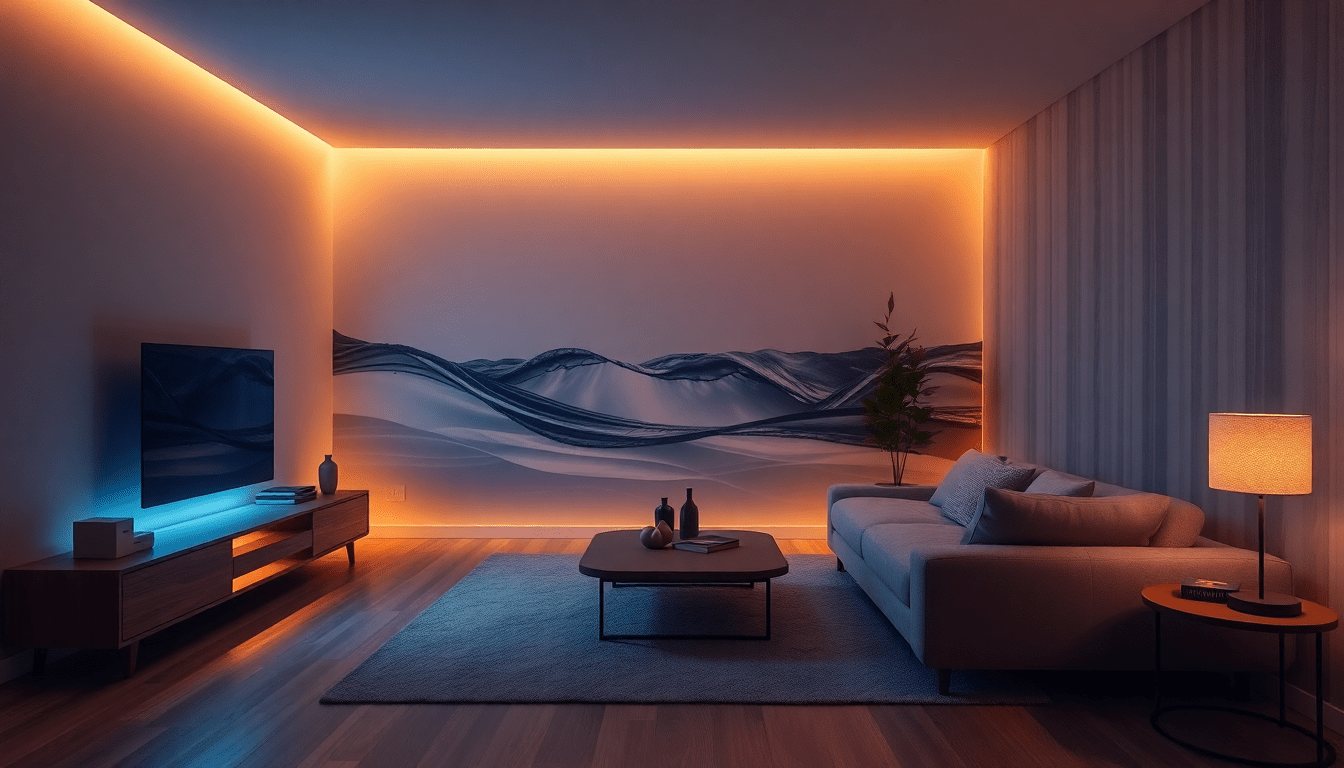
Core components explained: ocean-wave projectors, warm LEDs, and sensor scenes
- Ocean-wave projectors: Small devices that project moving light patterns that mimic the caustics of water. They create gentle, moving highlights and soft gradients across walls and ceilings.
- Warm LED strips and fixtures: Continuous LED tape, cove lights, and directional warm fixtures (2700–3200 K) that anchor furniture with a consistent glow.
- Sensor-driven scenes: Automated lighting states controlled by motion sensors, ambient light sensors, and timers. Scenes transition between functions (work, relax, sleep) without user input.
Design goals and aesthetic rules for a built-in look
- Create continuous light planes: run LEDs along edges and undersides to form uninterrupted lines that read architectural.
- Use layered lighting: combine ambient, task, and accent layers to avoid flat illumination and to define functions.
- Balance motion with stillness: keep ocean-wave effects subtle and low-contrast so they enhance rather than dominate.
- Favor warm temperatures: 2700–3200 K warms finishes and human skin tones, making pieces feel permanent.
- Minimize visible hardware and cables to maintain the illusion of integration.
Choosing the right ocean-wave projector
Key features to look for:
- Adjustable speed and intensity so you can tune motion for different rooms and times of day.
- Low contrast and soft edges; high-contrast projections read as theatrical and can overpower a small space.
- Multiple mounting options (table, clamp, shelf, or recessed) and plug-in power for renter-friendly setups.
- Color adjustability or preset warm-blue palettes to pair harmoniously with warm LEDs.
Placement tips:
- Behind floating shelves, above headboards, or near the corner of a media unit to wash adjacent surfaces with moving light.
- Aim at textured or matte surfaces (wood, plaster, fabric panels) rather than glossy paints to capture subtle variation.
- Use multiple low-output projectors spaced apart for wide, uniform motion rather than a single bright focal spot.
Warm LED selection and deployment
Warm LEDs anchor furniture visually and support human comfort.
- Color temperature: 2700–3200 K for built-in warmth; 3000–3200 K can be used for task areas when slightly brighter but still warm light is needed.
- CRI: Choose LEDs with CRI 90+ so materials look natural and colors remain true—important for making finishes read like built-in materials.
- LED tape vs. fixtures: LED tape is ideal for continuous runs along bases and coves; shallow downlights or integrated puck lights work for task zones.
- Dimming: Use smooth, flicker-free dimming compatible with your hub or driver so warm tones persist at lower outputs.
Sensor scenes and automation: making the system behave like architecture
Sensors remove control friction and make lighting feel like part of the room. Here are sensor types and scene strategies:
- Occupancy sensors: Trigger immediate task lights when sitting or standing near modular furniture; useful for desks and kitchen islands.
- Ambient light sensors: Prevent LEDs from running during bright daylight and smoothly ramp scenes at dusk to support circadian rhythms.
- Proximity sensors: Softly illuminate under a sofa or bed when someone approaches, reinforcing the built-in feel.
- Time-based schedules: Combine circadian schedules with occupancy for automated morning and evening transitions.
Scene presets to start with (tune to taste)
Below are actionable starting points. Use them as templates and adjust based on room size and personal preference.
- Morning Energize: 3500–4000 K task at 70–90% for work areas; under-furniture warm LED at 25% to anchor space; projector off. Triggered by motion between 6:00–9:00 with ambient light sensor ensuring daylight overrides.
- Daytime Focus: 4000 K for task zones, 3000 K ambient at 40–50% for living area; projector off. Enable occupancy timeout of 15–30 minutes.
- Evening Wind-Down: 2700 K ambient at 20–40%; projector on at low intensity with slow ripple speed; proximity sensors activate soft accent when entering. Use a 60–90 minute dimming curve to ease transition to sleep.
- Media Mode: Warm LEDs dim to 10–15% to create a glowing base; projector intensity increases slightly to add movement to background surfaces; motion sensors disabled or set to long timeout to avoid interruptions.
- Night Safety: Very low warm under-cabinet LEDs at 5–10% and projector off; motion sensor activates gentle pathway lighting to prevent harsh awakenings.
Integration and control: hubs, apps and voice assistants
For the smoothest experience, centralize control:
- Use a smart home hub (Zigbee, Z-Wave, Thread, or a Wi-Fi-based hub) compatible with your sensors and LED drivers.
- Group devices logically ("Bed Zone", "Work Nook", "Living Base") so scenes apply to relevant devices without manual selection.
- Enable voice control for quick overrides but rely on sensors for daily automation to preserve the built-in illusion.
Practical layouts: studio, micro living room, home office, and multifunctional spaces
Real-world examples help translate principles into practice.
Studio apartment: foldable bed + modular sofa
- Run warm LED tape along the base of the bed platform and the sofa sill so both pieces share a continuous light line when positioned together.
- Mount a low-contrast wave projector near a corner that washes the wall behind both pieces to create a single visual backdrop.
- Use an occupancy sensor to detect which zone is in use and swap scenes (sleep vs living) accordingly.
Micro living room: media wall with modular storage
- Conceal LED strips behind shelving faces so the wall behind the media unit is always slightly backlit, shrinking negative space between modules.
- Use a single projector to animate the wall behind the TV to reduce the perceived mass of the media cabinet.
- Set a Media Mode scene so lights dim smoothly and projector motion feels like ambient theater rather than distraction.
Home office nook: built-in desk feeling
- Install warm LED tape along the underside of a floating shelf above the desk to create a permanent-looking soffit.
- Pair with a directional warm task light and occupancy sensor that immediately boosts task brightness when you sit down.
- Use an evening schedule to dip task lights and introduce indirect projector motion to encourage relaxation after work hours.
Kitchenette or tiny dining area
- Warm LEDs under upper cabinets visually extend cabinetry downwards, making standalone cabinets appear integrated.
- Subtle projector effects on a backsplash can add gentle motion while avoiding direct reflections on countertops.
- Ambient light sensors keep LEDs off in daytime to conserve energy and reduce glare.
Installation guides and renter-friendly options
Not everyone can hardwire lights or drill holes. Here are low-impact strategies:
- Use adhesive-backed LED tape and 3M command strips to mount light fixtures and small projectors.
- Choose battery-powered or USB-rechargeable motion and ambient sensors to avoid wiring.
- Plug-in LED drivers and projector units keep installation reversible; hide cables in paintable raceways or behind modular backs.
- For more permanent installs in owned homes, run low-voltage tracks in soffits and use concealed drivers to maintain a clean look.
Wiring and powering considerations
- Always match LED voltage and driver specs; common runs use 12 V or 24 V LED tape with appropriate constant-voltage drivers.
- For long LED runs, use 24 V to minimize voltage drop and preserve even brightness.
- Use flicker-free dimmers and drivers compatible with your smart hub to avoid visual artifacts in sensor-driven dimming.
- Consider power budgeting for battery sensors and wireless hubs; place hubs where they have good range to all devices.
Fine-tuning and troubleshooting
- If projector motion feels too busy: reduce intensity, slow speed, or move it further from the wall.
- Visible seams between modular units: add a continuous LED run along the seam to visually bridge pieces.
- Sensors triggering too often: increase cooldown timers, reduce sensitivity, or adjust mounting angle.
- Uneven LED brightness: check voltage drop and feed from both ends or use thicker gauge wiring for long runs.
Energy, cost, and sustainability considerations
- LEDs are highly efficient; even continuous base lighting at low levels (10–30%) uses minimal energy compared with older halogen systems.
- Sensor automation reduces runtime and energy use by ensuring lights are only on when needed.
- Choose long-life LED products and repairable drivers where possible to minimize waste.
- Projectors with LED light engines are more efficient and have lower maintenance than lamp-based units.
Style and material pairings for the best visual results
Certain finishes render projections and warm LEDs more effectively:
- Textured wood and plaster: excellent for catching projector ripples and adding dimensionality.
- Neutral matte paints: provide a subtle canvas for motion without distracting gloss reflections.
- Woven textiles and acoustic panels: soften the light and add gentle diffusion for a refined biophilic effect.
Content and SEO strategy for this topic
To maximize organic traffic, focus on keyword clusters and user intent:
- Primary keywords: biophilic lighting, small spaces lighting, ocean-wave projector, warm LED strips, sensor scenes smart lighting.
- Long-tail variations: how to make modular furniture feel built-in, best projector for apartment, under-cabinet LED tape small rooms, occupancy sensor lighting scenes.
- Content types to support ranking: product roundups, DIY installation guides, before-and-after case studies, video demonstrations of projector effects, and FAQs.
Example project plan: from concept to living
Use this step-by-step plan for a typical 350–450 sq ft studio with modular furniture:
- Audit the space: identify focal walls, furniture placement, and power locations.
- Choose fixtures: one low-output ocean-wave projector, continuous warm LED tape for base runs, two occupancy sensors, and a centralized smart hub.
- Map circuits and cable runs: prefer plug-in units for renters, plan concealed runs for owners.
- Install LED tape and route wiring behind modular backs; mount projector and program initial scenes for morning, work, and evening.
- Tune: walk through daily routines for a week and adjust intensity, color temperature, projector speed, and sensor timers until transitions feel natural.
Before-and-after considerations and photography tips
- Shoot before photos in even daylight to show raw furniture layout; photograph after in evening to highlight warm LEDs and projector motion.
- Use long-exposure or short video clips to capture projector movement—motion is hard to show in single static photos.
- Note white balance: set camera WB to match warm LEDs (around 2800–3200 K) to show the ambience accurately.
Maintenance and lifespan
- LED strips typically last 25,000–50,000 hours; keep drivers in well-ventilated spaces to maximize life.
- Clean projector lenses periodically and check mounts for loosening—movement over time can change the intended wash.
- Replace batteries in wireless sensors annually (or switch to rechargeable models) to avoid outages that interrupt scenes.
Common mistakes to avoid
- Overusing projector intensity—too bright and motion becomes distracting rather than calming.
- Using cool white LEDs for base lighting—this can make furniture feel temporary and clinical.
- Relying solely on automation without manual override—users should always be able to quickly change scenes.
- Installing LEDs with visible adhesives or messy cabling—neatness sells the built-in illusion.
Final checklist: a quick reference before you build
- Anchor bases with warm LED tape (2700–3200 K) and high CRI.
- Add subtle ocean-wave projection to create depth behind modular units.
- Program occupancy, ambient, and proximity sensors to automate transitions.
- Hide cables and use continuous light planes to blur the line between furniture and architecture.
- Tune scenes for low contrast and smooth transitions—test over several days and tweak settings.
Biophilic smart lighting is one of the most powerful tools for making small, modular environments feel calm, cohesive, and intentional. With deliberate choices—warm LEDs to anchor, projectors to add depth, and sensors to remove friction—you can transform a handful of modular pieces into a space that reads like architecture.
Visit XENTAR for more lighting, decor & furniture curated for modern homes and creative spaces.


Share:
Smart Scene Libraries for Small Spaces: Create Automated Lighting Presets That Make Convertible Furniture Feel Built-In
Tailored Lightscapes: Sensor-Driven Ambient Lighting to Anchor Convertible Furniture in Small Spaces