Introduction: Why Lighting Is the Secret in Micro-Rooms
In homes where every square foot counts, lighting is a design multiplier. Thoughtful ambient, task, and accent lighting can make compact spaces feel larger, more flexible, and far more usable—especially when combined with foldaway furniture like Murphy beds, drop-leaf tables, and foldout desks. This blueprint gives you practical strategies, measurements, wiring tricks, smart-control recipes, and styling tips to integrate lighting seamlessly with multifunctional furniture.
Meta-Friendly Overview (Under 160 Characters)
What This Guide Covers
- Design goals and measurable targets for micro-room lighting.
- Detailed fixture selection and placement for common foldaway furniture types.
- Low-voltage wiring strategies, connectors, and safety tips for moving parts.
- Smart scenes, automation recipes, and ecosystem recommendations (Matter, Zigbee, Wi‑Fi).
- Styling tips, maintenance schedules, budget ranges, and a do-it-yourself vs pro checklist.
Core Lighting Goals for Micro-Room Design
- Maximize perceived space by layering light rather than increasing raw brightness.
- Create clearly defined zones for sleeping, working, dining, and storage.
- Enable fast, reliable transitions between modes (one-button scenes).
- Maintain safety and unobstructed movement around moving furniture.
- Optimize energy efficiency and long-term serviceability.
Quantifiable Targets: Lux, Lumens & Color Temperatures
- Ambient lighting: 100–300 lux across the room for general use.
- Task lighting: 300–500 lux for work desks and kitchen-style prep surfaces; up to 1,000 lux for precision tasks like hobby work.
- Accent lighting: 50–150 lux to emphasize textures, art, or architectural details.
- Color temperature strategy: 2700–3000K for relaxation zones; 3000–4000K for work and general tasks; tunable white (2200–6500K) if you want circadian control and scene versatility.
- Color rendering: Choose LEDs with CRI 90+ for true colors on textiles and decor, especially where finish and fabric selection are part of the design aesthetic.
Zoning a Micro-Room: Activity Mapping
Start with a simple activity map. Sketch the room and mark these zones:
- Sleep zone (foldaway bed or sofa bed)
- Work zone (fold-down desk or wall-mounted workstation)
- Dining/entertaining (drop-leaf or foldout table)
- Storage/entry and circulation
For each zone, list the key lighting needs, lux targets, and whether the light should move with the furniture or stay fixed:
- Fixed lights: ceiling ambient fixtures, wallwashers, and general recessed lights.
- Moving furniture-integrated lights: strip lights inside Murphy cavities, puck lights in fold-down cabinets, and under-shelf LEDs.
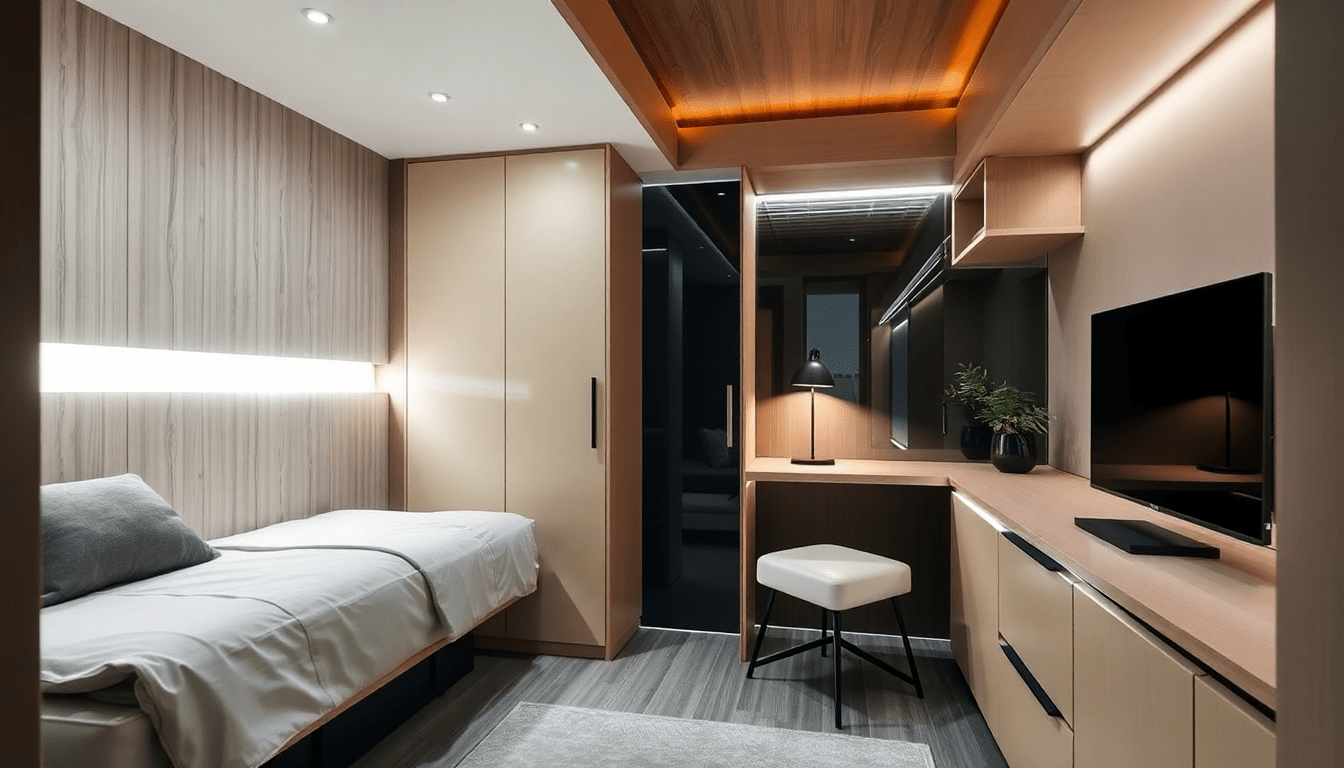
Fixture Types and Where to Use Them
- Recessed downlights: low-profile wide beams provide even ambient light without cluttering a low ceiling.
- Flush or semi-flush mounts: good for very low ceilings where recessed fittings aren't possible.
- Pendants: use small-diameter or low-profile pendants over foldaway tables when headroom allows; consider adjustable-height or swiveling mounts to stay centered when furniture moves.
- LED strips: perfect for hidden ambient glow inside furniture cavities, behind headboards, under shelves, and along toe-kicks.
- Wall sconces and swing-arm lamps: free up floor space and provide directional task light for reading or working.
- Puck lights and micro spotlights: excellent inside cabinets, on adjustable rails, or to highlight decor details.
- Surface-mounted or track fixtures: flexible placement for renters or multi-purpose layouts.
Design Patterns: Layering Light for Depth and Flexibility
Layered lighting makes small rooms feel larger and adapts to multiple uses:
- Base ambient layer: even, glare-free illumination from recessed fixtures or a central fixture.
- Secondary task layer: desk lamps, under-cabinet strips, or adjustable sconces for concentrated work.
- Accent layer: narrow-beam spots or LED strips to add texture and depth.
- Wayfinding and safety layer: low-level LED strips along walkways, stairs, or closet thresholds activated by motion sensors.
Integrating Lighting with Foldaway Furniture: Technical Strategies
Furniture that moves presents wiring challenges. Plan for these early—during furniture design or before any permanent cuts are made:
- Route low-voltage 12–24V DC wiring through hinge cavities or false backs to reduce shock risk and simplify connectors.
- Use flexible braided cables and provide generous service loops at hinge points to avoid strain.
- Use magnetic quick-disconnects or waterproof push-fit connectors at separable joints to allow easy maintenance and cleaning.
- Consider battery- or USB-powered lighting components for retrofits or locations where running mains wiring is impractical. Choose rechargeable systems with an accessible charging port or hidden dock.
- Use soft-close hinges and strain-relief grommets to protect wiring in high-stress zones.
Safety and Code Considerations
- Follow local building and electrical codes for any mains wiring; obtain permits where required.
- Keep low-voltage wiring accessible or documented for future inspection.
- Avoid running mains cables across hinge paths. If mains must move, use purpose-built flexible conduit and strain reliefs designed to the expected flex cycles.
- Install thermal protection and proper ventilation for confined fixtures inside furniture cavities to avoid heat buildup.
Smart Controls: Scenes, Sensors, and Automation Recipes
Smart lighting is transformative in micro-rooms because a single tap or voice command can reconfigure the entire space.
- Scene presets: create mode-based scenes such as Sleep, Work, Dinner, and Relax. Each scene adjusts brightness and color temperature to the activity.
- Occupancy and proximity sensors: trigger safe low-level lighting when you enter or when the furniture is unfolding.
- Furniture-aware automation: tie light activation to sensors or switches embedded in furniture. For example, when a Murphy bed is lowered, interior cavity strips and bedside reading lamps turn on automatically.
- Geo and schedule controls: daylight simulation alarms that raise bright, cool light before your day starts and wind-down scenes that lower color temp and brightness at night.
- Local physical overrides: always include easily accessible physical switches or dimmers for guests or during network outages.
- Interoperability: choose systems compatible with Matter, Zigbee, Thread, or mainstream Wi‑Fi ecosystems depending on your home's long-term plan.
Smart Ecosystem Recommendations
- Matter-compatible hubs: future-proof for cross-brand device interoperability.
- Zigbee/Thread for mesh reliability: useful in dense urban flats where Wi‑Fi may be congested.
- Wi‑Fi bulbs for simple installs: convenient but can tax your network with many devices.
- Hybrid approach: use a hub for critical automations and retain Wi‑Fi devices for simpler, isolated fixtures.
Blueprint Templates: Three Highly Practical Micro-Room Layouts
Below are expanded blueprint templates with fixture counts, lumen guidance, and control notes.
1. Single-Wall Murphy Bed Studio
- Room size: 10' x 12' (3.0 x 3.6 m)
- Ambient: 4 recessed 6" downlights (600 lm each) spaced evenly for 150–250 lux.
- Bed cavity: 1 concealed LED strip (12V, 3000K, 120 lm/m) inside Murphy housing with magnetic quick-disconnect; automatically turns on when bed deployed.
- Tasks: adjustable wall sconce by sofa/reading area and a swing-arm lamp by the fold-down desk.
- Accent: picture light or micro spot on wall art; 50–100 lm for depth.
- Controls: 4 scene presets (Entry, Work, Sleep, Clean) and an occupancy sensor at entry for night path lighting.
2. Lofted Bed with Foldout Desk
- Room size: 9' x 11' (2.7 x 3.4 m) with 9–10' high ceiling
- Ambient: 2 flush-mount LED panels or 3 surface-mounted cans for even distribution (700 lm each).
- Under-loft task: continuous LED strip with diffuser under loft to provide 400+ lux on desk surface. Include dimmable driver to tune between work and leisure levels.
- Access & safety: step lights integrated into loft ladder and rail-mounted pucks at head height.
- Controls: scheduled night-mode that dims under-loft light and switches on warm bedside glow.
3. Sofa Bed with Drop-Leaf Dining Table
- Room size: 11' x 14' (3.4 x 4.3 m)
- Ambient: central dimmable pendant or semi-flush (2,000 lm equivalent) with even spread.
- Dining: small linear LED or focused pendant mounted on a swivel bracket to center over the table when extended; use dedicated dimmer or smart scene.
- Accent: wall washers or uplights to visually separate seating and dining areas and create perceived depth.
- Controls: occupancy-based dining activation plus a low-power evening scene for relaxing after dinner.
DIY vs Professional Installation: When to Call an Electrician
- DIY-friendly tasks: installing plug-in LED strips, smart bulbs, surface-mounted fixtures, and sensors that don’t require new mains wiring.
- Call a professional if: you need new hardwired fixtures, run new mains circuits through moving furniture, modify structural elements, or require permit-obligated work.
- Pro tip: pre-plan with an electrician even for DIY projects—route suggestions early can avoid costly rework.
Budget Guide: Low, Mid, and Premium Ranges
- Low budget (under $500): plug-in LED strips, smart bulbs, a couple of smart plugs, motion sensors and a single smart hub or app control.
- Mid budget ($500–$2,500): recessed downlights, wired low-voltage LED strips integrated in furniture, an interoperable smart hub, and higher-CRI fixtures.
- Premium ($2,500+): professionally wired multi-zone systems, tunable white fixtures, Matter-compatible hub, custom magnetic disconnects and integrated furniture lighting engineered with the furniture maker.
Styling and Visual Tricks to Enhance Perceived Space
- Reflective ceilings and light-colored finishes increase light bounce and perceived height.
- Wall-washers and upward uplights visually lift low ceilings.
- Vertical accent lighting emphasizes height; horizontal layers emphasize depth—use both strategically to make the room look larger.
- Warm accents on textured fabrics add depth without overwhelming; keep ambient light slightly cooler to improve perceived clarity for tasks.
Seasonal & Circadian Adjustments
Seasonal changes—like shorter winter days—benefit from scheduled adjustments to maintain comfort and wellbeing:
- Winter mornings: increase cool, high-CRI light in the morning to support alertness.
- Summer evenings: rely on lower color temperature warm light and lower lumens to promote winding down.
- Circadian routines: tuneable white fixtures and scheduled scenes can simulate sunrise/sunset to support sleep quality.
Accessibility & Universal Design Considerations
- Position wall switches at accessible heights; add remote or voice control for mobility needs.
- Ensure motion sensors are configurable for sensitivity so they don’t turn off while someone is seated (especially important for desk tasks).
- Include battery backup lighting for safe navigation during power outages, especially around foldaway furniture and stair access points.
Maintenance, Troubleshooting & Longevity
- Choose LEDs rated 50,000+ hours and with replaceable drivers where feasible.
- Document wiring routes and tag connectors during installation for future troubleshooting.
- Test mechanical connections and magnetic disconnects on a maintenance schedule (every 6–12 months) to detect wear before failure.
- Keep spare LED modules or drivers in your home toolkit for quick replacements.
Common Problems and Fixes
- Flicker with dimming: ensure driver compatibility with dimmer type (leading vs trailing edge) and use high-quality drivers.
- Network disconnects: isolate critical automation to local hubs or use Zigbee/Thread mesh to avoid Wi‑Fi dropouts.
- Heat buildup in furniture cavities: increase ventilation or use lower-wattage LED modules and heat-dissipating aluminum channels.
- Loose connectors at hinges: switch to higher-rated magnetic connectors and add strain relief loops to cables.
Product Selection Checklist
- Confirm lumen output vs target lux for your zone and surface reflectance.
- Choose CRI 90+ if accurate color is important for textiles or art.
- Pick dimmable fixtures and confirm driver compatibility with your intended control system.
- Prefer low-voltage LED strips and centralized drivers for moving furniture to simplify disconnects.
- Insist on vendor documentation for firmware updates and ecosystem compatibility (Matter, Zigbee, Thread, Wi‑Fi).
Before-and-After Case Study (Example)
Scenario: A 9' x 10' studio with a Murphy bed and a fold-down desk. Before: single central fixture, low light, cluttered desk. After implementing this blueprint: recessed ambient layer for even distribution, cavity strip that automatically activates when the bed opens, a dimmable under-shelf strip for the desk, and occupancy sensor for night path lighting. Result: perceived space increased, transitions between work and sleep became seamless, and energy use dropped by half due to efficient LEDs and occupancy controls.
Implementation Roadmap: Step-by-Step
- 1. Measure and map zones and furniture motion ranges precisely.
- 2. Set lux and color temperature targets for each zone.
- 3. Select fixtures and determine wiring routes; choose low-voltage where moving parts are involved.
- 4. Prototype with temporary plug-in strips and smart bulbs to validate scenes and brightness.
- 5. Finalize wiring, install magnetic disconnects and strain reliefs, and mount permanent fixtures.
- 6. Program scenes, test automations, and label wiring for future service.
- 7. Schedule a maintenance checklist and reserve spare parts.
Frequently Asked Questions (FAQs)
- Q: Can I use wireless LED strips for moving furniture? A: Wireless (battery or USB) strips work well for retrofits and avoid wiring across hinges—but plan for accessible charging and battery life expectations.
- Q: Is tunable white necessary in micro-rooms? A: It's not required but enables better circadian control and offers scene flexibility for different activities.
- Q: How do I keep lighting unobtrusive? A: Use concealed LED strips, low-profile fixtures, and match fixture finishes with furniture for a seamless look.
Final Thoughts: Lighting as a Form of Spatial Engineering
In micro-homes, lighting doesn’t just illuminate—it engineers perception, supports function, and defines daily rituals. By planning layered illumination, leveraging low-voltage integration for moving parts, and relying on smart scenes for instant transitions, you can transform foldaway furniture from a necessary compromise into a delightful feature. Treat lighting as a core part of furniture planning rather than an afterthought and you’ll unlock more livability from every square foot.
Visit XENTAR for more lighting, decor & furniture curated for modern homes and creative spaces.


Share:
Mood-First Smart Ambient Lighting: Curate Light Palettes That Make Convertible Furniture Feel Purpose-Built in Small Spaces
Smart Scene Libraries for Small Spaces: Create Automated Lighting Presets That Make Convertible Furniture Feel Built-In