Meta-friendly intro
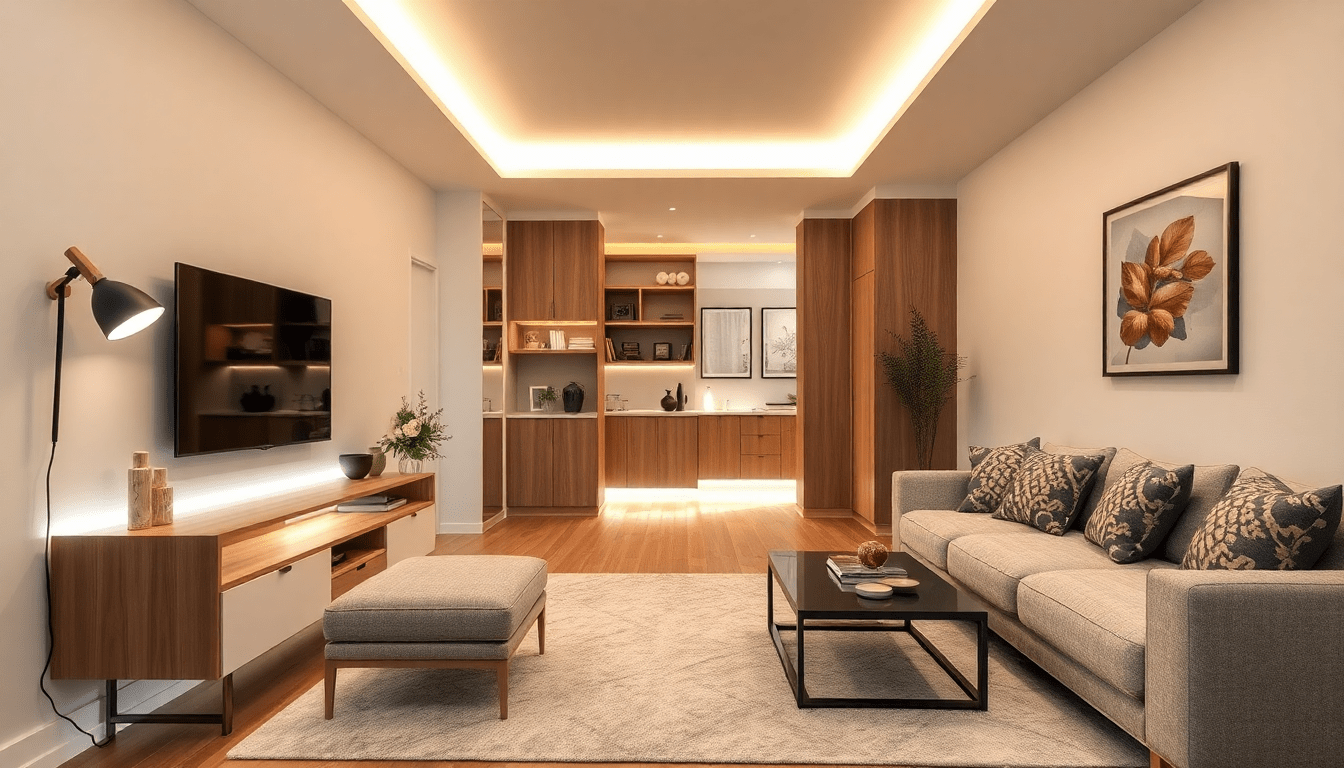
Edge-to-edge illumination with concealed LEDs and smart controls + multifunctional furniture makes small spaces feel larger, more adaptable, and stylish.
Why edge-to-edge illumination is a game-changer for small spaces
In compact homes, visual clutter and poor light distribution can make rooms feel cramped, noisy, and uncomfortable. Edge-to-edge illumination—continuous, indirect lighting that visually stretches across walls, ceilings, and furniture—solves these problems by smoothing shadows, lifting perceived ceiling heights, and creating a consistent visual plane. When you combine concealed LEDs with smart lighting controls and furniture that does double duty, every square foot becomes more functional and visually coherent.
SEO keywords to target in this post
- edge-to-edge illumination
- concealed LED lighting
- smart lighting for small spaces
- multifunctional furniture ideas
- space-saving lighting design
- ambient lighting tips
- LED cove lighting
Core benefits of concealed LEDs + multifunctional furniture
- Perceived space expansion: Indirect, continuous light reduces contrast and makes boundaries recede.
- Clutter reduction: Concealed light sources eliminate the need for multiple lamps, freeing floor and surface space.
- Flexible zones: Smart scenes let the same footprint operate as a workspace by day and a relaxing lounge by night.
- Integrated utility: Furniture with built-in lighting improves usability—think illuminated drawers, fold-down desks with task light, and floating shelves with accent LEDs.
- Energy and maintenance savings: LEDs consume less power and last longer; smart scheduling reduces wasted runtime.
How edge-to-edge illumination works: tech explained
Edge-to-edge illumination relies on three technical elements working together:
- High-quality LED strips: Choose continuous LED strips with high-density chips for even light output and fewer hotspots.
- Aluminum profiles and diffusers: Recessed or surface-mounted channels with diffusers spread light evenly and hide the strip.
- Smart drivers and controllers: Dimmable drivers and networked controllers enable scenes, tunable white, and color control for adaptive lighting.
Tunable white LEDs (2700–6500K range) let you shift between warm relaxed scenes and cooler focus modes. High CRI (>90) preserves color accuracy for decor and textiles—important when a small space must perform multiple visual roles.
Multifunctional furniture: the partner in crime
Multifunctional furniture transforms single-purpose zones into hybrid areas without increasing footprint. Popular types that pair exceptionally well with concealed lighting include:
- Convertible sofas and murphy beds: Backlighting at the headboard or recessed LEDs in the cabinet add ambient light without floor lamps.
- Storage benches and ottomans: Under-seat LEDs illuminate contents and create a floating effect.
- Fold-down desks and wall-mounted workstations: Edge lighting provides uniform task light without a bulky desk lamp.
- Modular shelving and room dividers: Recessed LED channels highlight objects and visually separate zones.
- Kitchen islands and multipurpose counters: Integrated under-counter lighting keeps countertops uncluttered and functional.
Design principles for pairing lighting and furniture
To create cohesive small-space design, follow these guiding principles:
- Layer light: Combine edge-to-edge ambient LEDs with task and accent lights built into furniture for flexibility.
- Define zones with color and intensity: Different CCTs and dim levels help distinguish work zones from relaxation areas in the same room.
- Favor continuous lines: Lighting integrated along furniture edges or ceiling coves draws the eye horizontally and creates visual continuity.
- Keep furniture low and slim: Low-profile furniture paired with up-lighting or cove lighting preserves sightlines and enhances perceived volume.
- Use reflectors and finishes: Light-colored walls, satin paints, and selective glossy surfaces amplify concealed light without glare.
Room-by-room strategies
Here’s how to apply edge-to-edge illumination and multifunctional furniture by room type:
Studio / open-plan living
- Cove LED lighting around the perimeter softens transitions and increases perceived ceiling height.
- Use a modular sofa with integrated lighting and storage to delineate the living area from the sleeping nook.
- Program scenes: Day (bright, cool light), Evening (warm, dimmed), Guest Mode (accent shelves and bedside light up).
Kitchen and micro-kitchen
- Under-cabinet concealed LED strips are a must—task lighting without cluttered fixtures.
- Integrate LEDs into pull-out drawers and pantry shelves to improve visibility and create a luxe feel.
- Choose IP65-rated strips for areas near sinks and cooktops to protect against moisture and cooking fumes.
Bedroom
- Backlit headboards offer soft reading light without bedside lamps, freeing surfaces for decor or storage.
- Tunable white strips allow a bright cool wake-up scene and a warm dim bedtime scene for better circadian support.
- Concealed wardrobe lighting makes small closets more usable and reduces the need for central overhead light.
Home office / Work corner
- Edge-lit fold-down desks give even task illumination while maintaining a minimalist look when closed.
- Use cooler CCTs (3500–4000K) for focus and higher lumens per foot for work surfaces.
Bathroom
- Backlit mirrors and recessed LED channels around cabinets provide soft, flattering illumination without bulk.
- Ensure appropriate IP-rated fixtures and sealed channels in wet areas.
Kids’ rooms & multipurpose spaces
- Use programmable scenes and low-level night paths along baseboards integrated into storage furniture.
- Color-changing strips can be used sparingly for play zones and then set to neutral for sleep time.
Choosing components: specs that matter
- Color Temperature (CCT): 2700–3000K for cozy ambient; 3000–4000K for balanced living/work; use tunable white for versatility.
- Color Rendering Index (CRI): Target CRI >90 for accurate colors in decor and textiles.
- Lumen output: Ambient edge lighting: ~100–300 lm/ft; Task strips: ~300–600 lm/ft (approximate ranges).
- Voltage and power: Low-voltage (12V or 24V) systems are common; match drivers to total strip wattage + 20% headroom.
- IP rating: IP20 for dry locations; IP44+ or IP65 for humid or splash-prone areas.
- Diffuser/profile: Use recessed aluminum channels with milky diffusers to achieve edge-to-edge uniformity.
- Smart control compatibility: Choose controllers compatible with your ecosystem (Wi‑Fi, Bluetooth Mesh, Zigbee, Z‑Wave) and voice assistants.
Smart scenes and automation ideas
Smart controls are where concealed lighting and multifunctional furniture truly shine. Useful scenes include:
- Morning Boost: Gradual brighten with cooler white to simulate sunrise and prepare a workspace.
- Focused Work: High-lumen task lighting on desks and counters, cool CCT, shutters for ambient strips dimmed.
- Wind Down: Warm, low-level edge light, headboard and shelf lights on while task lights off.
- Entertain: Accent LEDs on shelves and behind furniture elevate the mood; sync to music for dynamic effect.
- Night Path: Low lux baseboard lighting that activates on motion to guide movement without disturbing sleep.
Step-by-step planning and installation guide
Careful planning is essential for clean concealment and reliable operation.
- Step 1 — Map zones and functions: List every area, function, and desired scene. Note furniture choices and power availability.
- Step 2 — Measure and calculate: Measure lengths for strips, calculate total wattage, and size drivers with headroom (20–30%).
- Step 3 — Select hardware: Choose strip density, CRI, CCT, aluminum channels, diffusers, and compatible drivers/controllers.
- Step 4 — Plan cable runs: Design hidden cable pathways through furniture cavities or ceiling voids. Keep runs under recommended lengths to avoid voltage drop (or use 24V for longer runs).
- Step 5 — Mock-up and test: Before final installation, tape temporary strips and test scenes, dimming, and color shifts to verify visual effects.
- Step 6 — Final installation: Recess channels, mount strips, wire drivers, and conceal controllers. Leave access panels for maintenance.
- Step 7 — Commissioning: Calibrate scenes, check for flicker at low dim levels, update firmware on smart devices, and document locations and power specs for future maintenance.
DIY vs professional installation: what to consider
- DIY-friendly tasks: Installing adhesive low-voltage strips, plug-and-play smart LED kits, and simple under-shelf lighting for renters.
- When to hire pros: Recessed ceiling coves, hardwired drivers, mains-level dimmers, and integrated furniture electrification—hire an electrician or lighting pro for safety and code compliance.
- Cost factors: Complexity, number of zones, smart controller types, and whether new wiring or furniture modifications are required.
Budgeting: approximate cost ranges (USD)
- Entry-level starter kit (strips + plug driver): $50–$200
- Mid-range concealed installation (recessed channels, high-CRI strips, drivers): $300–$1,000 per zone
- Professional integrated systems (multiple zones, networked controllers, hardwiring): $1,500–$5,000+ depending on scale
Sustainability and energy performance
- LEDs typically use 70–90% less energy than incandescent sources; smart scheduling can further reduce runtime.
- Choose products with long-rated lifespans (50,000 hours+), efficient drivers, and recyclable aluminum channels to reduce lifecycle impact.
- Consider sensor-based controls and occupancy scheduling in rarely used multifunctional zones to avoid wasted lighting.
Common mistakes and how to avoid them
- Hotspots and strip visibility: Use diffusers and high-density strips to avoid seeing individual LEDs.
- Insufficient driver sizing: Always oversize drivers by 20–30% to prevent premature failure.
- Poor color matching: Match CCT and CRI across zones to avoid clashing tones that break the edge-to-edge illusion.
- Blocking ventilation: Allow airflow around drivers and inside furniture cavities to prolong component life.
- Neglecting control integration: Pick an ecosystem early (e.g., HomeKit, Google, Alexa) to ensure seamless control and future expandability.
Real-world mini case studies
Case study 1 — 350 sq ft studio: Visual expansion and dual function
Problem: A compact studio felt boxed-in and required separate living and sleeping zones.
- Solution: Installed perimeter cove LEDs (recessed channels) and a modular sofa with under-seat storage and integrated lighting. Tunable white drivers created separate Day and Night scenes. A fold-down desk with edge lighting became the dedicated workspace.
- Result: Visual height increased, fewer lamps were needed, and the same footprint performed three functions—sleep, work, entertain—without feeling cluttered.
Case study 2 — Micro-kitchen retrofit
Problem: Poor counter illumination and crowded surfaces in a tiny galley kitchen.
- Solution: Added IP65 under-cabinet strips, LED drawer lighting, and toe-kick path lighting. A slim island with integrated under-counter lighting reduced the need for pendant fixtures.
- Result: Counters became fully usable, surfaces uncluttered, and the kitchen felt wider and more inviting.
Maintenance, troubleshooting & longevity
- Clean diffusers quarterly to maintain output; dust and grease can reduce perceived brightness.
- If you notice flicker at low dim levels, check driver compatibility and choose LED strips rated for smooth dimming or upgrade to compatible drivers.
- Replace drivers before strips if you notice color shifting; LEDs often outlast their power supplies.
- Keep firmware updated on smart controllers to patch bugs and improve compatibility.
Frequently asked questions (FAQ)
- Can I retrofit concealed LED into existing furniture? Yes—adhesive strips and surface-mounted channels make retrofits possible. For recessed effects, furniture modification may be required.
- Will LEDs make my small room feel too bright? No—use dimmers and tunable white to reduce intensity and warm color temperature for cozy scenes.
- Is it safe to put LEDs inside closed drawers or cabinets? Yes if you use low-heat strips, allow ventilation for drivers, and use strips rated for enclosed spaces where necessary.
- Which smart ecosystem should I pick? Choose based on existing devices—HomeKit for Apple users, Google Home for Android-heavy homes, or neutral Zigbee/Z‑Wave controllers for broader interoperability.
Final checklist before you commit
- Map every zone and furniture function, and assign lighting roles (ambient, task, accent).
- Match CCT and CRI across zones to preserve the edge-to-edge effect.
- Plan wiring runs and driver access points within furniture or ceiling cavities.
- Test sample strips in situ before final installation to evaluate diffusion and color rendering.
- Decide whether a DIY approach is suitable or whether a licensed electrician and lighting designer are needed for a seamless result.
Edge-to-edge illumination, when combined with smart lighting and multifunctional furniture, creates an adaptable, polished, and efficient small-space environment. Thoughtful specification, planning, and integration are the keys to achieving the illusion of more space while enhancing real usability.
Visit XENTAR for more lighting, decor & furniture curated for modern homes and creative spaces.


Share:
Smart Ambient Lighting for Modular Furniture: Micro-Room Strategies to Maximize Function, Comfort & Style in Small Homes
Lighting That Moves With Your Furniture: Dynamic Smart Lighting Designs to Enhance Multifunctional Small Spaces